WARNING: The symbol on this product means that it's an electronic product and following the European directive
2012/19/EU the electronic products have to be dispose on your local recycling centre for safe treatment.
: Данный символ на изделии означает, что это электронный продукт и, в соответ-
ствии с европейской директивой 2012/19/EU, должен быть утилизирован в местном центре утилизации.
AVERTISSEMENT: le symbole gurant sur ce produit signie qu’il s’agit d’un produit électronique et, conformément à
la directive européenne 2012/19/EU, les produits électroniques usagés doivent être apportés dans un point de collecte pour
leur recyclage.
UYARI: Bu ürün hakkında sembolü 2012/19 / AB elektronik ürünler güvenli tedavi için yerel geri dönüşüm merkezinde
imha gereken Avrupa direktifi takiben bir elektronik ürün ve anlamına gelir.
//EU
EU//
Française
Introduction
Les mesures de pression artérielle réalisées avec l’CF175f sont équivalentes à
celles obtenues par un observateur expérimenté utilisant un brassard/sté-
thoscope, dans les limites prescrites par la norme nationale américaine sur
les sphygmomanomètres électroniques ou automatiques. Cet instrument est
réservé à un usage domestique par des adultes. Le patient est un opérateur
prévu. Ne l’utilisez pas pour relever la pression artérielle d’enfants ou de bébés.
L’CF175f est garanti contre les défauts de fabrication par un programme de
garantie internationale. Pour plus d’informations sur la garantie, contactez le
fabricant: Rossmax International Ltd.
Attention: Consultez les documents d’accompagnement. Veuillez lire ce
manuel attentivement avant l’emploi. Pour obtenir des informations spéci-
ques sur la pression artérielle, contactez votre médecin. Veillez à conserver
ce manuel.
Technologie de mesure Real Fuzzy
Cet instrument utilise la méthode oscillométrique pour détecter la pression ar-
térielle. Avant le gonage du brassard, l’instrument établit une pression de base
équivalente à la pression de l’air. Il détermine le niveau de gonage approprié
sur la base des oscillations de pression, puis le dégonage du brassard.
Pendant le dégonage, l’instrument détecte l’amplitude et la pente des oscilla-
tions de pression. Ce faisant, il détermine les pressions artérielles systolique et
diastolique, et le pouls.
Remarques préliminaires
Ce tensiomètre est conforme aux réglementations européennes et présente
le marquage CE «CE1639». La qualité de l’instrument a été contrôlée et est
conforme aux dispositions de la directive européenne 93/42/CEE (appareils
médicaux), annexe 1, exigences fondamentales et normes harmonisées appli-
quées:
EN 1060-1: 1995/A2: 2009 Sphygmomanomètres pour mesures non invasives -
Partie 1 - Exigences générales
EN 1060-3: 1997/A2: 2009 Sphygmomanomètres pour mesures non invasives
- Partie 3 - Exigences supplémentaires pour systèmes de mesure de pression
artérielle électromécaniques
EN 1060-4: 2004 Sphygmomanomètres pour mesures non invasives - Partie 4:
Procédures d’essai pour déterminer la précision système globale de sphygmo-
manomètres automatiques à mesure non invasive.
ISO 81060-2: 2013 Sphygmomanomètres non invasifs - Partie 2: Investigation
clinique du type de mesure automatique.
Ce tensiomètre a été conçu pour une utilisation de longue durée. Pour main-
tenir la précision spéciée, prévoyez un réétalonnage de tous les tensiomètres
numériques. Ce tensiomètre n’exige pas de réétalonnage avant 2 ans (dans un
cas d’utilisation normale avec env. 3 mesures par jour). Quand un réétalonnage
est nécessaire, l’instrument ache
. Un réétalonnage est aussi nécessaire si
l’instrument subit des dommages dus à un choc violent (chute) ou à une expo-
sition aux liquides ou à des variations d’humidité ou de température basses ou
élevées extrêmes. Quand
s’ache, renvoyez l’instrument au revendeur local
en vue du réétalonnage.
Norme relative à la pression artérielle
Reportez-vous aux dénitions de l’Organisation mondiale de la Santé, les plages
de pression artérielle peuvent être classées en 6 catégories. (Réf. 1999, OMS-
Directives de la Société Internationale de l’Hypertension Lignes directrices pour
la gestion de l’hypertension). Cette classication de la pression artérielle se base
sur des données historiques et ne peut être appliquée telle quelle à un patient
donné. Veuillez consulter votre médecin régulièrement. Il vous indiquera votre
plage de pression artérielle normale de même que les valeurs considérées
comme un risque. Pour une surveillance et une documentation ables de la
pression artérielle, conservez des enregistrements à long terme. Veuillez télé-
charger votre carnet de pression artérielle sur le site www.rossmax.com.
Description de l’écran
EE / Erreur de mesure: Assurez-vous que la che L est bien branchée sur la
prise d’air et refaites la mesure. Ajustez correctement le brassard et gardez votre
bras immobile pendant la mesure. Si l’erreur persiste, renvoyez l’instrument au
distributeur ou centre SAV local.
E1 / Défaut du circuit d’air: Assurez-vous que la che L est bien branchée sur
la prise d’air sur le côté de l’instrument et refaites la mesure. Si l’erreur persiste,
renvoyez l’instrument au distributeur ou centre SAV local.
E2 / Pression dépassant 300 mmHg:Eteignez l’instrument et refaites une
mesure. Si l’erreur persiste, renvoyez l’instrument au distributeur ou centre SAV
local.
E3 / Erreur de données: Enlevez les piles, attendez 60 secondes, puis reinse-
rez-les. Si l’erreur persiste, renvoyez l’instrument au distributeur ou centre SAV
local.
Er / Mesure hors plage: Refaites la mesure. Si l’erreur persiste, renvoyez l’ins-
trument au distributeur ou centre SAV local.
Détection de l’enroulement du brassard
Si le brassard a été enroulé de façon trop lâche, cela peut provoquer des résul-
tats de mesure non ables. La « Détection de l’enroulement du brassard » peut
vous aider à déterminer si le brassard est assez serré. L’icône indiquée
appa-
raît lorsqu’un « brassard lâche » a été détecté lors de la mesure. Sinon, l’icône in-
diquée
apparaît si le brassard était enroulé correctement pendant la mesure.
Détecteur de mouvement
Le “Détecteur de mouvement” permet de rappeler à l’utilisateur de rester im-
mobile et indique tout mouvement du corps pendant la mesure. L’icône spéci-
ée s’ache une fois “le mouvement du corps” a été détectée pendant et après
chaque mesure.
Remarque: Il est fortement recommandé que vous mesure à nouveau si l’icône
apparaît.
Indication des risques d’hypertension artérielle (HRI)
L’Organisation mondiale de la Santé classe les plages de pression sanguine en
6 niveaux. Cet appareil est équipé d’un indicateur innovant de risque de pres-
sion artérielle, qui indique visuellement le niveau supposé de risque (optimal /
normal / normal élevé / hypertension de niveau 1 / hypertension de niveau 2 /
hypertension de niveau 3) du résultat après chaque mesure.
Détecteur de trouble du rythme cardiaque (IHB)
Cet instrument est équipé d’un détecteur de trouble du rythme cardiaque (IHB)
permettant aux personnes qui sourent de battements de cœur irréguliers
d’obtenir une indication précise sur une éventuelle arythmie cardiaque pen-
dant la mesure.
Remarque: Nous vous recommandons vivement de consulter votre médecin si
l’icône IHB (
) apparaît souvent.
Choisir votre langue
1. Sélectionnez la langue choisie on appuyant sur la touche de sélection de la
langue marqué par un «
» sur la séquence
2. «
1/ 2.... OF/ 1/ 2.... » apparaitra sur l’écran les diérentes langues.
Utilisation du bloc secteur CA (en option)
1. Raccordez le bloc secteur CA à la prise jack CA sur le côté droit l’instrument.
2. Branchez le bloc secteur CA sur la prise. (Les blocs secteur CA nécessaires sont
indiqués à côté de la prise jack CA.)
Attention:
1. Veuillez enlever les piles si vous opérez en mode CA pendant une longue
période. Un long séjour des piles dans le logement peut provoquer des
fuites susceptibles d’endommager l’instrument.
2. Pas de piles nécessaires en mode CA.
3. Les blocs secteur CA sont optionnels. Contactez le distributeur pour plus
d’informations sur les blocs secteur CA compatibles.
4. Utilisez seulement le bloc secteur CA autorisé avec ce tensiomètre. Pour plus
d’informations sur le bloc secteur CA autorisé, référez-vous à l’ANNEXE 1.
Insertion des piles
1. Pressez et relevez le couvercle du logement des piles dans le sens de la èche
pour ouvrir le logement.
2. Insérez ou remplacez 4 piles «AAA» dans le logement conformément aux
indications situées à l’intérieur.
3. Reposez le couvercle du logement en engageant d’abord les crochets du bas,
puis l’extrémité supérieure.
4. Remplacez les piles par paire. Enlevez les piles avant une longue période
d’inutilisation de l’instrument.
Vous devez remplacer les piles quand
1. L’icône «Faible état de charge» s’ache
2. Vous pressez la Touche ON/OFF/DEMARRAGE et que l’écran reste noir.
Attention:
1. Les piles font partie des déchets spéciaux. Ne les jetez pas avec les or-
dures ménagères.
2. L’instrument ne contient pas de pièces réparables par l’utilisateur. Les piles ou
dommages résultant de piles usagées sont exclus de la garantie.
3. Utilisez exclusivement des piles de marque. Remplacez toujours les piles en
bloc. Utilisez des piles de même marque et de même type.
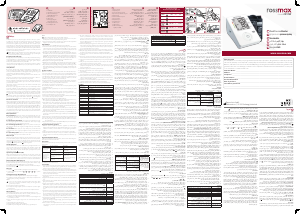
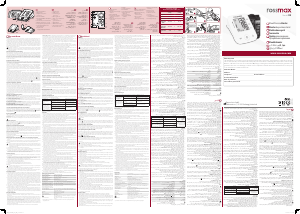
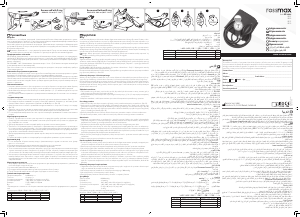
Mise en place du brassard
1. Déroulez le brassard en laissant l’extrémité du brassard passer à travers la
bague D.
2. Passez votre bras gauche à travers le brassard. Orientez le repère de couleur
vers vous, le tuyau suivant la direction du bras (g. ). Votre paume gauche
étant en haut, placez le bord du brassard environ 1,5 à 2,5 cm au-dessus du
creux du coude (g. ). Serrez le brassard en tirant sur son extrémité.
3. Centrez le tuyau sur le bras. Appuyez sur le crochet et xez l’ensemble. Vous
devez pouvoir placer 2 doigts entre le brassard et votre bras. Placez le repère
de l’artère (Ø) sur l’artère principale (à l’intérieur du bras) (g. .). Remarque:
Localisez l’artère principale en appuyant avec 2 doigts environ 2 cm au-des-
sus du coude, à l’intérieur du bras gauche. Repérez l’endroit où le pouls est le
plus fort. C’est l’artère principale.
4. Branchez le tuyau de connexion du brassard sur le tensiomètre (g. ).
5. Posez le bras sur une table (paume en haut) de sorte que le brassard se trouve
à hauteur du cœur. Assurez-vous que le tuyau n’est pas plié (g. ).
6. Ce brassard convient à votre bras si la èche coïncide avec la ligne conti-
nue en couleur illustrée à droite (g. ). Si la èche se trouve en dehors de
cette ligne, vous avez besoin d’un brassard d’un autre périmètre. Contactez le
revendeur local pour obtenir des brassards d’autres tailles.
Procédures de mesure
Voici quelques conseils utiles pour obtenir des mesures plus précises:
• La pression artérielle change à chaque battement de cœur et varie constam-
ment pendant la journée.
• La mesure de la pression artérielle peut être aectée par la position de l’uti-
lisateur, son état physiologique et d’autres facteurs. En vue d’une précision
maximale, ne mesurez pas la pression artérielle moins d’une heure après avoir
fait du sport, pris un bain, mangé, bu des boissons alcoolisées ou de la caféine,
ou fumé.
• Nous vous recommandons de vous asseoir au moins 5 minutes dans un lieu
calme, étant donné qu’un état détendu augmente la précision. Vous ne de-
vriez pas être épuisé pendant la prise d’une mesure.
• Ne faites pas de mesures quand vous êtes stressé ou tendu.
• Asseyez-vous sur une chaise et prenez 5-6 respirations profondes. Évitez de
vous pencher pendant que la mesure est prise.
• Ne croisez pas les jambes en position assise et gardez les pieds à plat sur le sol
pendant la mesure.
• Evitez de parler et de bouger les muscles de votre main ou bras pendant la
mesure.
• Mesurez la pression artérielle à une température corporelle normale. Si vous
avez froid ou chaud, attendez un peu avant de faire une mesure.
• Si le tensiomètre est stocké à très basse température (près de 0°), mettez-le
dans un endroit tempéré au moins une heure avant de l’utiliser.
• Attendez 5 minutes avant de prendre la prochaine mesure.
1. Pressez la touche ON/OFF/DEMARRAGE. Tous les achages apparaissent
pendant une seconde avant le retour à «0».
2. L’instrument gone automatiquement le brassard au niveau approprié, en
fonction des oscillations du pouls de l’utilisateur. La mesure commence alors.
Il est important de rester immobile et calme durant la mesure. Tout mouve-
ment sensible peut aecter les résultats de mesure.
3. A la n de la mesure, la pression systolique, la pression diastolique et le pouls
sont achés simultanément et mémorisés automatiquement. Jusqu’à 90
mémoires peuvent être enregistrées.
4. La mesure est maintenant achevée. Appuyez sur la touche ON/OFF/DEMAR-
RAGE pour mettre l’instrument hors tension. Si aucune touche n’est pressée,
l’instrument s’arrête au bout de 1 minute.
English
Introduction
Blood pressure measurements determined with CF175f are equivalent to
those obtained by a trained observer using cu/stethoscope auscultation
method, within the limits prescribed by the American National Standard,
Electronic or Automated Sphygmomanometers. This unit is to be used by
adult consumers in a home environment. The patient is an intended op-
erator. Do not use this device on infants or neonates. CF175f is protected
against manufacturing defects by an established International Warranty Pro-
gram. For warranty information, you can contact the manufacturer, Rossmax
International Ltd.
Attention: Consult the accompanying documents. Please read this
manual carefully before use. For specic information on your own blood
pressure, contact your physician. Please be sure to keep this manual.
Real Fuzzy Measuring Technology
This unit uses the oscillometric method to detect your blood pressure. Be-
fore the cu starts inating, the device will establish a baseline cu pressure
equivalent to the air pressure. This unit will determine the appropriate ina-
tion level based on pressure oscillations, followed by cu deation.
During the deation, the device will detect the amplitude and slope of the
pressure oscillations and thereby determine for you the systolic blood pres-
sure, diastolic blood pressure, and pulse.
Preliminary Remarks
This Blood Pressure Monitor complies with the European regulations and
bears the CE mark “CE 1639”. The quality of the device has been veried and
conforms to the provisions of the EC council directive 93/42/EEC (Medical
Device Directive), Annex I essential requirements and applied harmonized
standards.
EN 1060-1: 1995/A2: 2009 Non-invasive sphygmomanometers - Part 1 - Gen-
eral requirements
EN 1060-3: 1997/A2: 2009 Non -invasive sphygmomanometers - Part 3 - Sup-
plementary requirements for electro-mechanical blood pressure measuring
systems
EN 1060-4: 2004 Non-invasive sphygmomanometers - Part 4: Test Proce-
dures to determine the overall system accuracy of automated non-invasive
sphygmomanometers.
ISO 81060-2: 2013 Non-invasive sphygmomanometers - Part 2: Clinical inves-
tigation of automated measurement type.
This blood pressure monitor was designed for long service time. Ensure
continued accuracy, it’s recommended that all digital blood pressure moni-
tors require re-calibration. This monitor (under normal usage with approx. 3
measurements a day) does not require re-calibration for 2 years. Once the
unit should be re-calibrated the device will display
. The unit should also
be re-calibrated if the monitor sustains damage due to blunt force (such as
dropping) or exposure to uids and / or extreme hot or cold temperature /
humidity changes. When
appears, simply return to your nearest dealer for
re-calibration service.
Blood Pressure Standard
Refer to the denitions of the World Health Organization, the blood pressure
ranges can be classied into 6 grades. (Ref. 1999 WHO-International Soci-
ety of Hypertension Guidelines for the management of Hypertension). This
blood pressure classication are based on historical data, and may not be
directly applicable to any particular patient. It is important that you consult
with your physician regularly. Your physician will tell you your normal blood
pressure range as well as the point at which you will be considered at risk.
For reliable monitoring and reference of blood pressure, keeping long- term
records is recommended. Please download the blood pressure log at our
website www.rossmax.com.
Display Explanations
EE / Measurement Error: Make sure the L-plug is securely connected to
the air socket and measure again quietly. Wrap the cu correctly and keep
arm steady during measurement. If the error keeps occurring, return the de-
vice to your local distributor or service center.
E1 / Air Circuit Abnormality: Make sure the L-Plug is securely connected
to the air socket on the side of the unit and measure again quietly. If the
errors still occur, return the device to your local distributor or service center
for help.
E2 / Pressure Exceeding 300 mmHg: Switch the unit o and measure
again quietly. If the error keeps occurring, return the device to your local
distributor or service center.
E3 / Data Error: Remove the batteries, wait for 60 seconds, and reload. If the
error keeps occurring, return the device to your local distributor or service
center.
Er / Exceeding Measurement Range: Measure again quietly. If the error
keeps occurring, return the device to your local distributor or service center.
Cu Wrap Detection
If the cu was wrapped too loosely, it may cause unreliable measurement re-
sults. The “Cu Wrap Detection” can help to determine if the cu is wrapped
snugly enough. The specied icon
appears once a “loosen cu” has been
detected during measurement. Otherwise the specied icon
appears if
the cu is wrapped correctly during measurement.
Movement Detection
The “Movement Detection” helps reminding the user to remain still and is
indicating any body movement during measurement. The specied icon
appears once a “body movement” has been detected during and after each
measurement.
Note: It’s highly recommended that you measure again if the icon
ap-
pears.
Hypertension Risk Indication (HRI)
The World Health Organization, classifying blood pressure ranges into 6
grades. This unit is equipped with innovative blood pressure risk indication,
which visually indicates the assumed risk level (optimal / normal / high-nor-
mal/ grade1 hypertension / grade 2 hypertension / grade 3 hypertension) of
the result after each measurement.
Irregular Heartbeat (IHB) Detection
This unit is equipped with an Irregular Heartbeat (IHB) Detection which al-
lows those who have an irregular heartbeat to obtain accurate measure-
ments alerting the user of the presence of an irregular heart beat during the
measurement.
Note: It is strongly recommended that you consult your physician if the IHB
icon (
) appears often.
Multi- Languages Selection
1. Select language by pressing the Language Selection key labelled with a “
” in the sequence.
2. “
1/ 2.... OF/ 1/ 2....” will appear on the display for dierent lan-
guages.
Using the AC Adaptor (Optional)
1. Connect the AC adaptor with the AC adaptor jack on the right side of the
unit.
2. Plug the AC adaptor into the socket. (AC adaptors with required voltage
and current indicated near the AC adaptor jack.)
Caution:
1. Please unload the batteries when operating with the AC mode for a
longer period of time . Leaving the batteries in the compartment for a
long time may cause leakage, which may lead to damage of the unit.
2. No batteries are needed when operating with the AC mode.
3. AC adaptors are optional. Please contact the distributor for the compatible
AC adaptors.
4. Use only the authorized AC Adaptor with this blood pressure monitor.
Information for the authorized AC adaptor, please refer to APPENDIX 1.
Installing Batteries
1. Press down and lift the battery cover in the direction of the arrow to open
the battery compartment.
2. Install or replace 4 “AAA” sized batteries in the battery compartment ac-
cording to the indications inside the compartment.
3. Replace the battery cover by clicking in the bottom hooks rst, then push
in the top end of the battery cover.
4. Replace the batteries in pairs. Remove batteries when unit is not in use for
extended periods of time.
You need to replace the batteries when
1. Low battery icon appears on display.
2. The ON/OFF/START key is pressed and nothing appears on display.
Caution:
1. Batteries are hazardous waste. Do not dispose them together with the
household garbage.
2. There are no user serviceable parts inside. Batteries or damage from old
batteries are not covered by warranty.
3. Use exclusively brand batteries. Always replace with new batteries togeth-
er. Use batteries of the same brand and same type.
Applying the Cu
1. Unwrap the arm cu, leaving the end of the cu through the D-ring of
the cu.
2. Put your left arm through the cu loop. The color strip indication should be
positioned closer to you with the tube pointing in the direction of your arm
(Fig. ). Turn your left palm upward and place the edge of the arm cu at
approximately 1.5 to 2.5 cm above the inner side of the elbow joint (Fig. ).
Tighten the cu by pulling the end of the cu.
3. Center the tube over the middle of the arm. Press the hook and loop mate-
rial together securely. Allow room for 2 ngers to t between the cu and
your arm. Position the artery mark (Ø) over the main artery (on the inside
of your arm) (Fig. ,). Note: Locate the main artery by pressing with 2
ngers approximately 2 cm above the bend of your elbow on the inside
of your left arm. Identify where the pulse can be felt the strongest. This is
your main artery.
4. Plug in the cu connecting tube into the unit (Fig. ).
5. Lay your arm on a table (palm upward) so the cu is at the same height as
your heart. Make sure the tube is not kinked (Fig. ).
6. This cu is suitable for your use if the arrow falls within the solid color line
as shown on the right (Fig. ). If the arrow falls outside the solid color line,
you will need a cu with other circumferences. Contact your local dealer
for additional size cus.
Measurement Procedures
Here are a few helpful tips to help you obtain more accurate readings:
• Blood pressure changes with every heartbeat and is in constant uctuation
throughout the day.
• Blood pressure recording can be aected by the position of the user, his or
her physiological condition and other factors. For greatest accuracy, wait
one hour after exercising, bathing, eating, drinking beverages with alcohol
or caeine, or smoking to measure blood pressure.
• Before measurement, it’s suggested that you sit quietly for at least 5 minutes
as measurement taken during a relaxed state will have greater accuracy. You
should not be physically tired or exhausted while taking a measurement.
• Do not take measurements if you are under stress or tension.
• Sit upright in a chair, and take 5-6 deep breaths. Avoid leaning back while
the measurement is being taken.
• Do not cross the legs while sitting and keep the feet at on the oor during
measurement.
• During measurement, do not talk or move your arm or hand muscles.
• Take your blood pressure at normal body temperature. If you are feeling
cold or hot, wait a while before taking a measurement.
• If the monitor is stored at very low temperature (near freezing), have it
placed at a warm location for at least one hour before using it.
• Wait 5 minutes before taking the next measurement.
1. Press the ON/OFF/START key. All displays will appear for approximately one
second before returning to “0”.
2. The unit will automatically inate to the appropriate ination level based
on the user’s pulse oscillations. Measurement will then begin. It is impor-
tant to remain still and quiet during measurement. Any signicant move-
ment may aect measurement results.
3. When the measurement is completed, systolic, diastolic and pulse will be
shown simultaneously and be saved automatically in memory system. Up
to 90 memories can be saved.
4. Measurement is now completed. Press the ON/OFF/START key to turn
o the power. If no key is pressed, the unit will shut o automatically in
1 minute.
This blood pressure monitor will re-inate automatically to higher pressure
if the system detects that more pressure is needed to take a blood pressure
measurement.
Note: 1. This monitor automatically switches o approximately 1 minute after
last key operation.
2. To interrupt the measurement, simply press the Memory or ON/OFF/START
key; the cu will deate immediately.
Recalling Values from Memory
1. To recall stored blood pressure readings from memory, simply press the
Memory key, the rst reading displayed is the average of the last 3 meas-
urements stored in memory, and then the last set of memorized readings
will be displayed.
2. Another press of the Memory key will recall the previous set of readings.
3. All readings stored in memory will be displayed with its sequence number.
Every measurement comes with an assigned memory sequence number.
Clearing Values from Memory
Press and hold the Memory key for approximately 5 seconds, then the data in
the memory zone can be erased automatically.
Troubleshooting
If any abnormality will arise during use, please check the following points.
Symptoms Check Points Correction
No display when
the ON/OFF/
START key is
pressed
Have the batteries run
down?
Replace them with four new
batteries.
Have the batteries' polari-
ties been positioned incor-
rectly?
Re-insert the batteries in the
correct positions.
EE mark shown
on display or
the blood pres-
sure value is
displayed exces-
sively low (high)
Is the cuff placed correctly?
Wrap the cuff properly so
that it is positioned correctly.
Did you talk or move during
measurement?
Measure again. Keep wrist
steady during measurement.
Did you vigorously shake
the cuff during measure-
ment?
Note: If the unit still does not work, return it to your dealer. Under no circum-
stance should you disassemble and repair the unit by yourself.
Cautionary Notes
1. The unit contains high-precision assemblies. Therefore, avoid extreme
temperatures, humidity, and direct sunlight. Avoid dropping or strongly
shocking the main unit, and protect it from dust.
2. Clean the blood pressure monitor body and the cu carefully with a slight-
ly damp, soft cloth. Do not press. Do not wash the cu or use chemical
cleaner on it. Never use thinner, alcohol or petrol (gasoline) as cleaner.
3. Leaky batteries can damage the unit. Remove the batteries when the unit
is not used for a long time.
4. The unit should not be operated by children so to avoid hazardous situ-
ations.
5. If the unit is stored near freezing, allow it to acclimate at room temperature
before use.
6. This unit is not eld serviceable. You should not use any tool to open the
device nor should you attempt to adjust anything inside the device. If you
have any problems, please contact the store or the doctor from whom you
purchased this unit or please contact Rossmax International Ltd.
7. As a common issue for all blood pressure monitors using the oscillomet-
ric measurement function, the device may have diculty in determining
the proper blood pressure for users diagnosed with common arrhythmia
(atrial or ventricular premature beats or atrial brillation), diabetes, poor
circulation of blood, kidney problems, or for users suered from stroke, or
for unconscious users.
8. To stop operation at any time, press the ON/OFF/START key, and the air in
the cu will be rapidly exhausted.
9. Once the ination reaches 300 mmHg, the unit will start deating rapidly
for safety reasons.
10. Please note that this is a home healthcare product only and it is not in-
Точность измерений артериального давления с помощью прибора CF175f
эквивалента точности таких измерений, производимых лицом, прошед-
шим соответствующее обучение, с помощью манжеты и стетоскопа, в
пределах, соответствующим требованиям национального стандарта США
«Электронные и автоматические сфигмоманометры». Этот прибор может
использоваться взрослыми потребителями в домашних условиях. Пациент
является предполагаемым оператором. Не используйте это устройство
на младенцах или новорожденных. Отсутствие дефектов изготовления в
приборе CF175f гарантируется Международной программой гарантии.
За подробной информацией о гарантии обращайтесь к производителю -
Rossmax International Ltd.
Внимание: Ознакомьтесь с сопутствующей документацией. Перед ис-
пользованием тщательно прочтите это руководство. За конкретной
информацией об артериальном давлении обращайтесь к своему вра-
чу. Сохраните данное руководство для использования в будущем.
Real Fuzzy
Для определения артериального давления в данном приборе использует-
ся осциллометрический метод. Перед началом подачи воздуха в манжету
прибор определяет отправное значения давления в манжете, равное дав-
лению воздуха. Прибор определяет уровень давления в манжете, необход-
жимый для измерения, учитывая осцилляции (колебания) давления. После
достижения максимального давления воздух из манжеты стравливается.
Во время стравливания воздуха прибор определяет амплитуду и наклон
осцилляций давления и вычисляет значения систолического и диастоли-
ческого артериального давления, а также частоту пульса.
Данный прибор для измерения артериального давления отвечает требо-
ваниям европейских стандартов, что подтверждается знаком «CE 1639».
Качество прибора проверено на соответствие требованиям директивы EC
93/42/EEC (Директива по приборам медицинского назначения) Приложе-
ние 1.
EN 1060-1: 1995/A2: 2009 Неинвазивные сфигмоманометры - Часть 1 - Об-
щие требования
EN 1060-3: 1997/A2: 2009 Неинвазивные сфигмоманометры - Часть 3 - До-
полнительные требования для электромеханических систем для измере-
ния артериального давления
EN 1060-4: 2004 Неинвазивные сфигмоманометры - Часть 4: Процедуры
испытаний для определения полной системной точности автоматических
неинвазивных сфигмоманометров.
ISO 81060-2: 2013 Неинвазивные сфигмоманометры. -- Часть 2: Клиниче-
ские исследования типа автоматизированного измерения.
Этот измеритель кровяного давления рассчитан на продолжительный
срок службы. Для обеспечения постоянной точности измерений рекомен-
дуется периодически проводить повторную калибровку всех цифровых
приборов для измерения артериального давления. При нормальном ис-
пользовании (примерно 3 измерения в день) данный прибор не требует
проведения повторной калибровки в течение 2 лет. Если требуется про-
ведение повторной калибровки, на дисплее прибора появляется символ
. Следует также проводить повторную калибровку, если прибор получил
механически повреждения (например, при падении) или подвергся дей-
ствию жидкостей и/или значительных перепадов температуры или влаж-
ности. При появлении символа
следует обратиться в сервисный центр
для проведения повторной калибровки прибора.
Обратитесь к данным Всемирной организации здравоохранения, диапазо-
ны кровяного давления могут быть классифицированы на 6 классов. (Ссыл-
ка. 1999 ВОЗ Международное общество гипертонии Руководства по ис-
следованию гипертонии). Такая классификация артериального давления
основана на результатах проведенных исследований, она может не быть
непосредственно применимой к определенному пациенту. Очень важно
регулярно посещать своего врача. Он пояснит Вам, какие значения арте-
риального давления являются нормальными, а какие могут быть опасными
для Вашего здоровья. Для надежного контроля величины артериального
давления и для сравнения рекомендуется сохранять записи измеренных
значений артериального давления в течение длительного времени. На на-
шем веб-сайте www.rossmax.com можно загрузить бланк страницы журна-
ла для ведения таких записей.
,
EE / : Убедитесь, что коннектор плотно вставлен в
гнездо, повторите процедуру измерения. Правильно наложите манжету и
не двигайте рукой во время измерения. Если ошибка продолжает повто-
ряться, обратитесь в сервисный центр.
E1 / : Убедитесь, что коннектор плотно
вставлен в гнездо, и повторите процедуру измерения снова. Если ошибка
продолжает повторяться, обратитесь в сервисный центр.
E2 / 300 . .: Выключите прибор и повто-
рите измерение. Если ошибка продолжает повторяться, обратитесь в сер-
висный центр или к продавцу.
E3 / : Выньте и снова установите батареи. Если ошибка
продолжает повторяться, обратитесь в сервисный центр или к продавцу.
Er/ : Повторите измерение. Если
ошибка продолжает повторяться, обратитесь в сервисный центр или к
продавцу.
Если манжета обернута слишком свободно, это может привести к невер-
ным результатам измерений. « Система определения правильности оде-
той манжеты» может помогает определить, если манжета обернута не до-
статочно плотно. Специальный значок
появляется в случае «не туго за-
тянутой манжеты» во время измерения. В ином случае отображается спе-
циальный значок
, если манжета одета правильно во время измерения.
«Детектор движения» помогает пользователю контролировать свои дви-
жения и оставаться на месте, а также указывает любое движение тела во
время измерения. Значок «движение тела» появляется при каждом изме-
рении, но только тогда, когда был обнаружено движение тела.
Примечание: Настоятельно рекомендуется, повторить измерения, если
появился значок
.
Всемирная организация здравоохранения, классифицирует 6 классов ар-
териального давления. Это устройство оснащено инновационным индика-
тором риска повышенного артериального давления, который визуально
указывает допустимый уровень рисков (оптимальный / нормальный / вы-
сокий нормальный / 1-й класс гипертонии / гипертония 2-го класса / 3-й
класс гипертонии) показывает результат после каждого измерения.
Данный прибор имеет функцию определения аритмии, позволяющую про-
водить точные измерения при наличии аритмии. Прибор предупреждает
пользователя, если при измерении выявлена аритмия.
Примечание: Если символ аритмии (
) появляется часто, настоятельно
рекомендуется обратиться к врачу.
1. Нажимайте кнопку «Выбор языка», обозначенную символом «
».
2. На дисплее будут отображаться языки «
1/ 2.... OF/ 1/ 2....».
(
)
1. Подсоедините блок питания переменного тока к соответствующему
гнезду на правой стороне.
2. Вставьте вилку блока питания переменного тока в розетку. (Требуемые
значения выходного напряжения и тока блока питания указаны вблизи
гнезда для подключения.)
Внимание:
1. При использовании блока питания переменного тока в течение
длительного времени из прибора следует вынуть батареи. Если не-
используемые батареи находятся в приборе в течение длительного
времени, это может привести к их протеканию и повреждению при-
бора.
2. При применении блока питания батареи не используются.
3. Блоки питания от сети переменного тока поставляются отдельно. По во-
просам приобретения соответствующего блока питания обращайтесь к
продавцу.
4. С данным измерителем артериального давления можно использовать
только блок питания, одобренный производителем. Информация об
одобренных производителем блоках питания переменного тока приво-
дится в ПРИЛОЖЕНИИ 1.
1. Чтобы открыть батарейный отсек, нажмите на его крышку и поднимите
ее в направлении стрелки.
2. Установите в батарейный отсек 4 новые батареи размера “AAA” в со-
ответствии с обозначениями внутри отсека, при необходимости вынув
перед этим старые батареи.
3. Установите на место крышку батарейного отсека: сначала установите на
место выступы на нижней части крышке, затем защелкните ее верхнюю
часть.
4. Попарно замените батареи. Замену всех элементов питания необходимо
делать одновременно.
Необходимо заменить элементы питания, если
1. На дисплее появляется символическое изображение батареи.
2. При нажатии на Кнопка ВКЛ./ВЫКЛ./ПУСК прибор не включается.
Внимание!
1. Использованные батареи относятся к категории опасных отходов.
Не утилизируйте их вместе с бытовым мусором.
2. Внутри прибора нет деталей, требующих обслуживания потребителем.
Гарантия не распространяется на батареи и ущерб, причиненный их
протеканием.
3. При замене необходимо использовать только совершенно новые бата-
реи. Всегда заменяйте все батареи вместе. Используйте батареи одина-
кой марки и типа.
1 . Разверните манжету, пропустив свободный конец через D-образное
кольцо на манжете.
2 . Наденьте манжету на левую руку. Цветная полоска на манжете должна
быть обращена к пользователю, а трубка направлена параллельно руке
(рис. ). Разверните руку ладонью вверх и расположите манжету так,
чтобы ее край располагался на расстоянии 1,5-2,5 см выше локтевого
сгиба. (рис. ). Потянув за край манжеты, затяните ее на руке.
3. Расположите воздушную трубку по центру руки. Нажмите на застежку и
плотно застегните манжету. Оставьте немного свободного пространства
между манжетой и рукой – примерно столько, чтобы можно было засу-
нуть под манжету 2 пальца. Расположите значок артерии (Ø) над главной
артерией (на внутренней стороне руки) (рис. ,). Примечание: чтобы
найти главную артерию, прижмите 2 пальца примерно в 2 сантиметрах
над локтевым сгибом на внутренней стороне руки. Определите, где
пульс прощупывается лучше всего – это место прохождения главной
артерии.
4 . Подсоедините воздушную трубку манжеты к прибору с помощью кон-
нектора. (рис. ).
5. Положите руку на стол ладонью вверх так, чтобы манжета располагалась
на уровне сердца. Убедитесь, что трубка не пережата. (рис. )
6. Манжета подходит по размеру, если стрелка располагается в пределах
цветной полоски, как показано на рис. . Если стрелка лежит за преде-
лами цветной полоски, необходимо использовать манжету другого раз-
мера. Необходимо, чтобы трубка шла вдоль середины руки. Свяжитесь
с вашим местным дилером для получения дополнительных размеров
манжеты.
Несколько полезных советов для получения более точных результатов:
• Артериальное давление меняется с каждым ударом сердца и постоянно
колеблется в течение дня.
• На результат измерения артериального давления могут влиять положе-
ние тела пользователя прибора, его физиологическое состояние и дру-
гие факторы. Для более точного измерения артериального давления его
следует производить не ранее чем через час после физических нагрузок,
принятия ванны, принятия пищи, курения и употребления напитков, со-
держащих алкоголь или кофеин.
• Перед проведением измерения рекомендуется спокойно посидеть на
месте в течение не менее 5 минут, поскольку измерения, проводимые
в расслабленном состоянии, являются более точным. Не следует прово-
дить измерение давления в состоянии физической усталости или изне-
можения.
• Не следует проводить измерение давления в состоянии стресса или на-
пряжения.
• Сядьте вертикально в кресле и сделайте 5-6 глубоких вдохов. Избегайте
откидывания назад во время измерения.
• Не пересекайте ноги во время сидения и не держите ноги на полу во
время измерения.
• При проведении измерения не следует говорить и двигать рукой или ее
кистью.
• Артериальное давление необходимо измерять при нормальной темпе-
ратуре тела. Если же Вы ощущаете жар или озноб, отложите измерение
на некоторое время.
• Если прибор хранился при очень низкой температуре (примерно при
температуре замерзания или ниже), перед использованием его следует
выдержать в теплом помещении в течение не менее одного часа.
• Рекомендуемое время повторного измерения 5 минуты.
1. Нажмите кнопку ВКЛ./ВЫКЛ./ПУСК В течение примерно одной секунды
на дисплее отображаются одновременно все элементы, после чего на
экране появляется число «0».
2. Происходит автоматическое нагнетание воздуха в манжету до соответ-
ствующего уровня в зависимости от пульса пользователя. После этого
происходит измерение. При измерении важно не делать никаких дви-
жений. Любое значительное движение может повлиять на точность из-
мерения.
3. После проведения измерения на дисплее одновременно отображаются
значения систолического и диастолического давления и частоты пульса,
которые автоматически сохраняются в памяти прибора. В памяти могут
сохраняться до 90 результатов измерений.
4. Измерение завершено. Нажмите кнопку ВКЛ./ВЫКЛ./ПУСК для выключе-
ния прибора. Если не нажимать на эту кнопку, прибор автоматически
выключится через 1 минуту.
Этот тонометр будет автоматически накачиваться до более высокого дав-
ления, если система выявит, что для измерения артериального давления
требуется большее давление.
Примечание:
1. Данный прибор автоматически отключается примерно через 1 минуту
после последнего нажатия кнопки.
2. Чтобы прервать измерение, достаточно нажать кнопку памяти (М) или
кнопку ВКЛ./ВЫКЛ./ПУСК. После этого сразу начинается стравливание
воздуха.
1. Для того, чтобы просмотреть сохраненные результаты измерений, не-
обходимо нажать кнопку памяти (М). Первым на дисплее отображается
среднее значение для последних трех измерений, сохраненных в памя-
ти. На экране отобразится последний сохраненный результат.
2. Повторное нажатие кнопки памяти (М) выводит на экран результат пре-
дыдущего измерения.
3. Все результаты, сохраненные в памяти, отображаются на дисплее вместе
с их порядковым номером.
Нажмите и удерживайте кнопку памяти Memory не менее 5 секунд. Вся ин-
формация из памяти будет удалена.
Если при работе с прибором возникают неисправности, обратитесь к опи-
санию возможных неисправностей, приведенному ниже.
Неисправность Что следует проверить Исправление неисправ-
ности
При нажатии кноп-
ки ВКЛ./ВЫКЛ./
ПУСК прибор не
включается.
Достаточный ли уровень
заряда батарей?
Заменить старые бата-
реи на новые.
Правильно ли установле-
ны батареи (соблюдена ли
их полярность)?
Установите батареи в
правильном положении.
На дисплее появ-
ляются буквы EE,
или измеренное
значение артери-
ального давления
чрезмерно высо-
кое или низкое.
Правильно ли наложена
манжета?
Правильно наложите
манжету.
Во время измерения Вы
говорили или двигались?
Повторите измерения.
Во время измерения
запястье не должно
двигаться.
Во время измерения Вы
встряхнули запястьем с
манжетой?
Примечание: Если прибор по-прежнему не функционирует нормально, об-
ратитесь в сервисный центр. Ни при каких обстоятельствах не разбирайте
прибор и не пытайтесь самостоятельно его починить!
1. Прибор содержит высокоточные узлы и детали. Не подвергайте его
влиянию слишком высоких или слишком низких температур,действию
высокой влажности и прямых солнечных лучей. Прибор следует обе-
регать от падения, ударов и пыли.
2. Чистку измерителя артериального давления следует проводить с
осторожностью, используя слегка влажную мягкую ткань. При этом
не следует сильно давить на прибор. Нельзя мыть манжету в воде или
применять для ее чистки химические очистители. Для чистки нельзя ис-
Ce tensiomètre se regone automatiquement à un niveau plus élevé de pres-
sion. Si le système détecte qu‘il est nécessaire d‘avoir plus de pression pour
prendre une mesure de la pression artérielle.
Remarque:1. Ce tensiomètre s’arrête automatiquement 1 minute après la der-
nière pression de touche.
2. Pour interrompre la mesure, pressez la touche Mémoire ou ON/OFF/DEMAR-
RAGE. Le brassard se dégone tout de suite.
Rappel de valeurs enregistrées
1. Pour réacher les mesures de pression artérielle enregistrées, pressez la
touche Mémoire. La première lecture achée est la moyenne des 3 dernières
mesures mémorisées. Le dernier jeu de mesures enregistré sera aché.
2. Une autre pression de la touche Mémoire rappelle le jeu de mesures précé-
dent.
3. Toutes les mesures mémorisées sont achées avec le numéro d’enregistre-
ment. Chaque mesure est identiée par un numéro d’enregistrement.
Suppression de valeurs enregistrées
Maintenez la touche Mémoire enfoncée pendant 5 secondes environ. Les don-
nées seront automatiquement supprimées dans la zone de mémoire prédé-
nie.
Dépannage
En cas d’anomalie pendant l’utilisation, veuillez contrôler les points suivants.
Symptôme Points à contrôler Correction
Pas d'affichage à
la pression de la
touche ON/OFF/
DEMARRAGE
Les piles sont-elles déchar-
gées?
Remplacez-les par des
piles neuves.
Les polarités de pile ont-
elles été inversées?
Réinsérez les piles correc-
tement.
Le texte EE est affi-
ché ou la valeur de
pression artérielle
affichée est exces-
sivement basse
(élevée)
Le brassard a-t-il été mis
correctement?
Ajustez le brassard correc-
tement.
Avez-vous parlé ou bougé
pendant la mesure?
Refaites la mesure.
Gardez le poignet immo-
bile pendant la mesure.
Avez-vous agité le poignet
pourvu du brassard?
Remarque: Si l’instrument ne fonctionne toujours pas, renvoyez-le au reven-
deur. Ne démontez et ne réparez en aucun cas vous-même l’instrument.
Précautions
1. L'instrument contient des éléments de haute précision. Evitez par consé-
quent des températures extrêmes, l'humidité et un rayonnement solaire di-
rect. Evitez de faire tomber l'instrument ou de l'exposer à des chocs violents
et protégez-le de la poussière.
2. Nettoyez le boîtier du tensiomètre et le brassard avec précaution avec un
chion doux légèrement humide. N'appuyez pas. Ne lavez pas le brassard et
ne le nettoyez pas avec un détergent chimique. N'utilisez jamais de diluant,
d'alcool ou d'essence comme nettoyant.
3. Les coulures de piles peuvent endommager l'instrument. Enlevez les piles
avant une longue période d'inutilisation de l'instrument.
4. Conservez l'instrument hors de portée des enfants pour éviter des situations
dangereuses.
5. Si l'instrument est stocké dans un endroit proche de 0°, prévoyez une période
d'acclimatation à la température ambiante avant l'emploi.
6. Cet instrument n'est pas réparable par l'utilisateur. N'ouvrez pas l'instru-
ment avec un outil et n'essayez pas de le réparer. Si vous rencontrez des
problèmes, contactez le magasin ou le médecin chez qui vous avez acheté
cet instrument ou Rossmax International Ltd.
7. Comme tous les tensiomètres utilisant la fonction de mesure oscillomé-
trique, l'instrument peut avoir des dicultés à mesurer correctement la
pression artérielle d'utilisateurs sourant d'une arythmie cardiaque courante
(battements atriaux ou ventriculaires prématurés ou brillation atriale), de
diabète, d'une faible circulation sanguine, de problèmes rénaux ou ayant eu
une attaque ou étant inconscients.
8. Vous pouvez arrêter la mesure à tout moment avec la Touche ON/OFF/DE-
MARRAGE. L'air du brassard sera rapidement évacué.
9. Une fois que le gonage a atteint 300 mmHg, le brassard se dégone rapide-
ment par mesure de sécurité.
10. Veuillez noter qu'il s'agit d'un produit de surveillance médicale à usage do-
mestique qui ne se substitue pas à l'avis d'un médecin ou d'un professionnel
de la santé.
11. N'utilisez pas cet instrument pour le diagnostic ou le traitement d'un pro-
blème de santé ou d'une maladie. Les résultats de mesure sont une simple
référence. Consultez un professionnel de la santé pour l'interprétation des
mesures de pression. Contactez votre médecin si vous avez ou supposez
avoir un problème de santé. Ne modiez pas vos médicaments sans re-
cueillir l'avis de votre médecin ou d'un professionnel de la santé.
12. Interférences électromagnétiques: L'appareil contient des éléments élec-
troniques sensibles. Evitez des champs électriques ou électromagnétiques
intenses près de l'instrument (téléphones mobiles, fours micro-ondes, etc.).
Ces interférences peuvent altérer temporairement la précision des mesures.
13. Eliminez l'instrument, les piles, les composants et les accessoires selon la
réglementation locale.
14. Ce tensiomètre ne fournit pas la performance spéciée s'il est stocké ou
utilisé en dehors des plages de température et d'humidité spéciées.
15. Veuillez noter que la fonction du membre concerné peut être entravée lors
du gonage.
16. Il ne faut pas bloquer la circulation sanguine plus longtemps que nécessaire
au cours de la prise de tension. Si l’appareil ne fonctionne pas bien, retirez
le brassard du bras.
17. Évitez de presser, d’aplatir ou de plier le tuyau du brassard en le manipulant.
18. Évitez des mesures trop fréquentes ou une pression continue du brassard.
Elles entraînent une réduction de la circulation sanguine et constituent un
risque de blessure.
19. Veillez à ne pas placer le brassard sur un bras, dont les artères ou les veines
sont soumises à un traitement médical, par exemple en présence d’un dis-
positif d’accès intravasculaire destiné à un traitement intravasculaire ou en
cas de shunt artérioveineux.
20. N’utilisez pas le brassard sur des personnes qui ont subi une mastectomie.
21. Ne placez pas le brassard sur des plaies, son utilisation peut les aggraver.
22. Utilisez uniquement les brassards de rechange fournis ou d’origine. Dans le
cas contraire, vous obtiendrez des valeurs mesurées erronées.
23. L’ingestion de piles peut se révéler mortelle. Laissez par conséquent les piles
et les produits hors de portée des jeunes enfants. Au cas où une pile a été
avalée, faites immédiatement appel à un médecin.
24. N'utilisez pas la tubulure et / ou l'adaptateur secteur à d'autres ns que celles
spéciées, car elles peuvent entraîner un risque de strangulation.
25. Ne pas entretenir ou entretenir l'appareil et le brassard pendant son utili-
sation.
Caractéristiques
Méthode de mesure Oscillométrique
Plage de mesure Pression: 30-260 mmHg; pouls: 40~199 batt./minute
Capteur de pression Semi-conducteur
Précision Pression: ± 3 mmHg; pouls: ± 5 % de la lecture
Gonflage A pompe
Dégonflage Valve de libération d’air automatique
Capacité de stockage 90 mémoires
Arrêt automatique 1 minute après la dernière pression de touche
Environnement de
travail
10°C~40°C (50°F~104°F); 15%~85% HR; 700~1060
hPa
Stockage et transport
Environnement
-10°C~60°C(14°F~140°F); 10%~90% HR; 700~1060
hPa
Alimentation CC Quatre piles CC (AAA) de 6 V
Alimentation CA CC 6V, ≥600mA (taille de fiche: (-) Ø 4,0 ext., (+) Ø
1,7 int.)
Dimensions 124 (L) X 85 (W) X 68.6 (H) mm
Poids 232 g (P.B.) (sans piles)
Périmètre du bras Adulte: 24~40 cm (9.4”~15.7“)
Utilisateurs autorisés Adultes
Type BF: instrument et brassard procurant une pro-
tection spéciale contre l’électrocution.
Classification IP IP21: Protection contre la pénétration nuisible de
l’eau et les matières particulaires
* Caractéristiques modifiables sans préavis.
tended to serve as a substitute for the advice of a physician or medical
professional.
11. Do not use this device for diagnosis or treatment of any health problem or
disease. Measurement results are for reference only. Consult a healthcare
professional for interpretation of pressure measurements. Contact your
physician if you have or suspect any medical problem. Do not change
your medications without the advice of your physician or healthcare pro-
fessional.
12. Electromagnetic interference: The device contains sensitive electronic
components. Avoid strong electrical or electromagnetic elds in the
direct vicinity of the device (e.g. mobile telephones, microwave ovens).
These may lead to temporary impairment of measurement accuracy.
13. Dispose of device, batteries, components and accessories according to
local regulations.
14. This monitor may not meet its performance specication if stored or used
outside temperature and humidity ranges specied in Specications.
15. Please note that when inating, the functions of the limb in question may
be impaired.
16. During the blood pressure measurement, blood circulation must not be
stopped for an unnecessarily long time. If the device malfunctions, re-
move the cu from the arm.
17. Avoid any mechanical restriction, compression or bending of the cu line.
18. Do not allow sustained pressure in the cu or frequent measurements.
The resulting restriction of the blood ow may cause injury.
19. Ensure that the cu is not placed on an arm in which the arteries or veins
are undergoing medical treatment, e.g. intravascular access or therapy, or
an arteriovenous (AV) shunt.
20. Do not use the cu on people who have undergone a mastectomy.
21. Do not place the cu over wounds as this may cause further injury.
22. Only ever use the cus provided with the monitor or original replacement
cus. Otherwise erroneous results will be recorded.
23. Batteries can be fatal if swallowed. You should therefore store the batter-
ies and products where they are inaccessible to small children. If a battery
has been swallowed, call a doctor immediately.
24. Do not use the tubing and/or AC adaptor for any other purpose than
those specied, as they can cause risk of strangulation.
25. Do not service or maintain device and cu while in use.
Specications
Measurement Method Oscillometric
Measurement Range Pressure: 30~260 mmHg; Pulse: 40~199 beats/
minute
Pressure Sensor Semi conductor
Accuracy Pressure: ± 3mmHg; Pulse: ± 5% of reading
Inflation Pump Driven
Deflation Automatic Air Release Valve
Memory capacity 90 memories
Auto-shut-off 1 minute after last key operation
Operation Environment 10°C~40°C (50°F~104°F); 15%~85% RH;
700~1060 hPa
Storage and Transporta-
tion Environment
-10°C~60°C (14°F~140°F); 10%~90% RH;
700~1060 hPa
DC Power Source DC 6V four AAA Batteries
AC Power Source DC 6V, ≥600mA (Plug size: outer(-) is Ø4.0, in-
ner(+) is Ø1.7)
Dimensions 124 (L) X 85 (W) X 68.6 (H) mm
Weight 232 g (G.W.) (w/o Batteries)
Arm circumference Adult: 24~40 cm (9.4”~15.7”)
Limited Users Adult users
Type BF: Device and cuff are designed to pro-
vide special protection against electrical shocks.
IP Classification IP21: Protection against harmful ingress of water
and particulate matter
* Specifications are subject to change without notice.
пользовать растворители, спирт или бензин.
3. Протекающие батареи могут повредить прибор. Если прибор не ис-
пользуется в течение длительного времени, необходимо вынуть из
него батареи.
4. Для предотвращения опасных ситуаций данный прибор не должен ис-
пользоваться детьми.
5. Если прибор хранился при низкой температуре (примерно при темпе-
ратуре замерзания или ниже), перед использованием его необходимо
выдержать в течение часа при комнатной температуре.
6. Техническое обслуживание данного прибора потребителем не произ-
водится. Не следует пытаться открыть прибор с использованием ин-
струментов или производить настройку узлов и деталей внутри при-
бора. При возникновении проблем обращайтесь в сервисный центр, к
продавцу или непосредственно в компанию Rossmax International Ltd.
7. Общей проблемой для всех измерителей артериального давления,
использующих осциллометрический метод, является возникновение
трудностей при определении точного артериального давления при
аритмии (преждевременное сокращение предсердий или желудоч-
ков, мерцательная аритмия), диабете, плохом кровообращении, забо-
леваниях почек, а также у пациентов после инсульта или в бессозна-
тельном состоянии.
8. Чтобы прекратить измерение в любое время, нажмите кнопку ON/OFF/
START, после чего начинается быстрое стравливание воздуха из ман-
жеты.
9. Если давление в манжете превышает 300 мм. рт. ст., автоматически на-
чинается быстрое стравливание воздуха из манжеты для обеспечения
безопасности.
10. Данный прибор, предназначенный для использования в домашних ус-
ловиях, не может заменить обследование у врача.
11. Не используйте прибор для диагностики и лечения каких-либо забо-
леваний. Результаты измерений имеют исключительно ознакомитель-
ный характер. Для интерпретации результатов измерений следует
обратиться к врачу. Если у Вас возникла какие-либо проблема со здо-
ровьем или Вы подозреваете ее наличие, обращайтесь к своему врачу.
Не изменяйте схему лечения, не проконсультировавшись с врачом.
12. Электромагнитные помехи: прибор содержит чувствительные элек-
тронные узлы. Не размещайте прибор вблизи от сильных электри-
ческих или электромагнитных полей (возле мобильных телефонов,
микроволновых печей и пр.) Это может привести к временным сбоям
в работе прибора.
13. Утилизируйте прибор, его батареи, узлы и дополнительные приспосо-
бления в соответствии с местным законодательством.
14. Не гарантируется правильная работа прибора, если он используется
или хранится при температуре и влажности, не соответствующим ука-
занным в инструкции.
15. Обратите внимание на то, что во время накачивания может быть на-
рушена подвижность соответствующей части тела.
16. Во время измерения кровяного давления не допускается прерывание
циркуляции крови на длительное время. При сбое в работе прибора
снимите манжету с руки.
17. Избегайте механического сужения, сдавливания или сги-бания шланга
манжеты.
18. Избегайте длительного давления в манжете и частых из-мерений. На-
рушение кровообращения может привести к повреждениям.
19. Убедитесь в том, что к кровеносным сосудам руки, на ко-торую на-
кладывается манжета, не подсоединено медицинское оборудование
(через внутрисосудистый доступ, арте-риовенозный шунт или при
внутрисосудистой терапии).
20. Не используйте манжету у лиц с ампутированной грудью.
21. Во избежание дальнейших повреждений не кладите манжету поверх
ран.
22. Используйте только входящие в объем поставки или оригинальные
запасные манжеты. В противном случае получаются неверные резуль-
таты измерений.
23. Проглатывание батареек может приводить к опасности для жизни.
Поэтому храните батарейки и изделия в не-доступном для детей ме-
сте. В случае проглатывания батарейки незамедлительно обратитесь
к врачу.
24. Не используйте трубку и / или адаптер переменного тока для любых
других целей, кроме указанных, поскольку они могут вызвать риск уду-
шения.
25. Не используйте и не держите устройство и манжету во время исполь-
зования.
Метод измерения Осциллометрический
Диапазон измерений Давление: 30-260 мм. рт. ст.; частота пульса:
40~199 уд./мин
Датчик давления полупроводниковый
Погрешность измерений давление ± 3 мм. рт. ст.; пульс ± 5 %
Нагнетание воздуха с помощью насоса
Стравливание воздуха автоматическое
Емкость памяти 90 ячеек
Автоматическое отклю-
чение
через 1 минуту после последнего нажатия
кнопки
Условия эксплуатации
температура
10°C~40°C (50°F~104°F), относительная влаж-
ность воздуха 15%~85%; 700~1060 hPa
Хранение и Условия хра-
нения температура
-10°C~60°C (14°F~140°F), относительная влаж-
ность воздуха 10%~90%; 700~1060 hPa
Источник питания пост. тока 6 В пост. тока, четыре батареи
типа (АAА)
Источник питания
перем. тока
6 В пост. тока, ток ≥600 мА (размер вилки:
внешний (-) Ø4,0, внутренний (+) Ø1,7)
Размеры 124 (Д) X 85 (Ш) X 68.6 (В) мм
Вес 232 г (брутто, без батарей)
Плечевая манжета 24~40 см(9.4”~15.7”) (для взрослых)
Группа пользователей взрослые
Конструкция прибора и манжеты защищают
от поражения электрическим током.
IP Классификация IP21: Защита от вредных попаданий воды и
пылевидных частиц
*Производитель оставляет за собой право изменять технические ха-
рактеристики без предупреждения.
Electromagnetic Compatibility Information
1. This device needs to be installed and put into service in accordance with the information
provided in the user manual.
2. WARNING: Portable RF communications equipment (including peripherals such as
antenna cables and external antennas) should be used no closer than 30 cm (12 inches)
to any part of the CF175f, including cables specied by the manufacturer. Otherwise,
degradation of the performance of this device could result.
If higher IMMUNITY TEST LEVELS than those specied in Table 9 are used, the minimum
separation distance may be lowered. Lower minimum separation distances shall be
calculated using the equation specied in 8.10.
Manufacturer’s declaration-electromagnetic immunity
The CF175f is intended for use in the electromagnetic environment specied below.
The customer or the user of the CF175f should assure that is used in such and environ-
ment.
Immu-
nity test
IEC 60601 test
level
Compliance
level
Electromagnetic environment-guidance
Con-
ducted
RF IEC
61000-
4-6
3 Vrms:
0,15 MHz – 80
MHz
6 Vrms: in ISM
and amateur
radio bands
between
0,15 MHz and
80 MHz
80 % AM at
1 kHz
3 Vrms:
0,15 MHz – 80
MHz
6 Vrms: in ISM
and amateur
radio bands
between
0,15 MHz and
80 MHz
80 % AM at
1 kHz
Portable and mobile RF communications
equipment should be used no closer to
any part of the CF175f including cables,
than the recommended separation dis-
tance calculated from the equation appli-
cable to the frequency of the transmitter.
Recommended separation distance:
d = 1,2 √P, d = 1,2 √P 80MHz to 800 MHz,
d = 2,3 √P 800MHz to 2,7 GHz
Where P is the maximum output power
rating of the transmitter in watts (W) ac-
cording to the transmitter manufacturer
and d is the recommended separation
distance in metres (m).
Interference may occur in the vicinity of
equipment marked with the following
symbol:
Radiated
RF IEC
61000-
4-3
10 V/m
80 MHz – 2,7
GHz
80 % AM at
1 kHz
10 V/m
80 MHz – 2,7
GHz
80 % AM at
1 kHz
NOTE1: At 80 MHz and 800 MHz, the higher frequency range applies.
NOTE2: These guidelines may not apply in all situations. Electromagnetic propagation
is aected by absorption and reection from structures, objects and people.
More information on EMC compliance of the device can be obtained from Rossmax
website: www.rossmax.com.
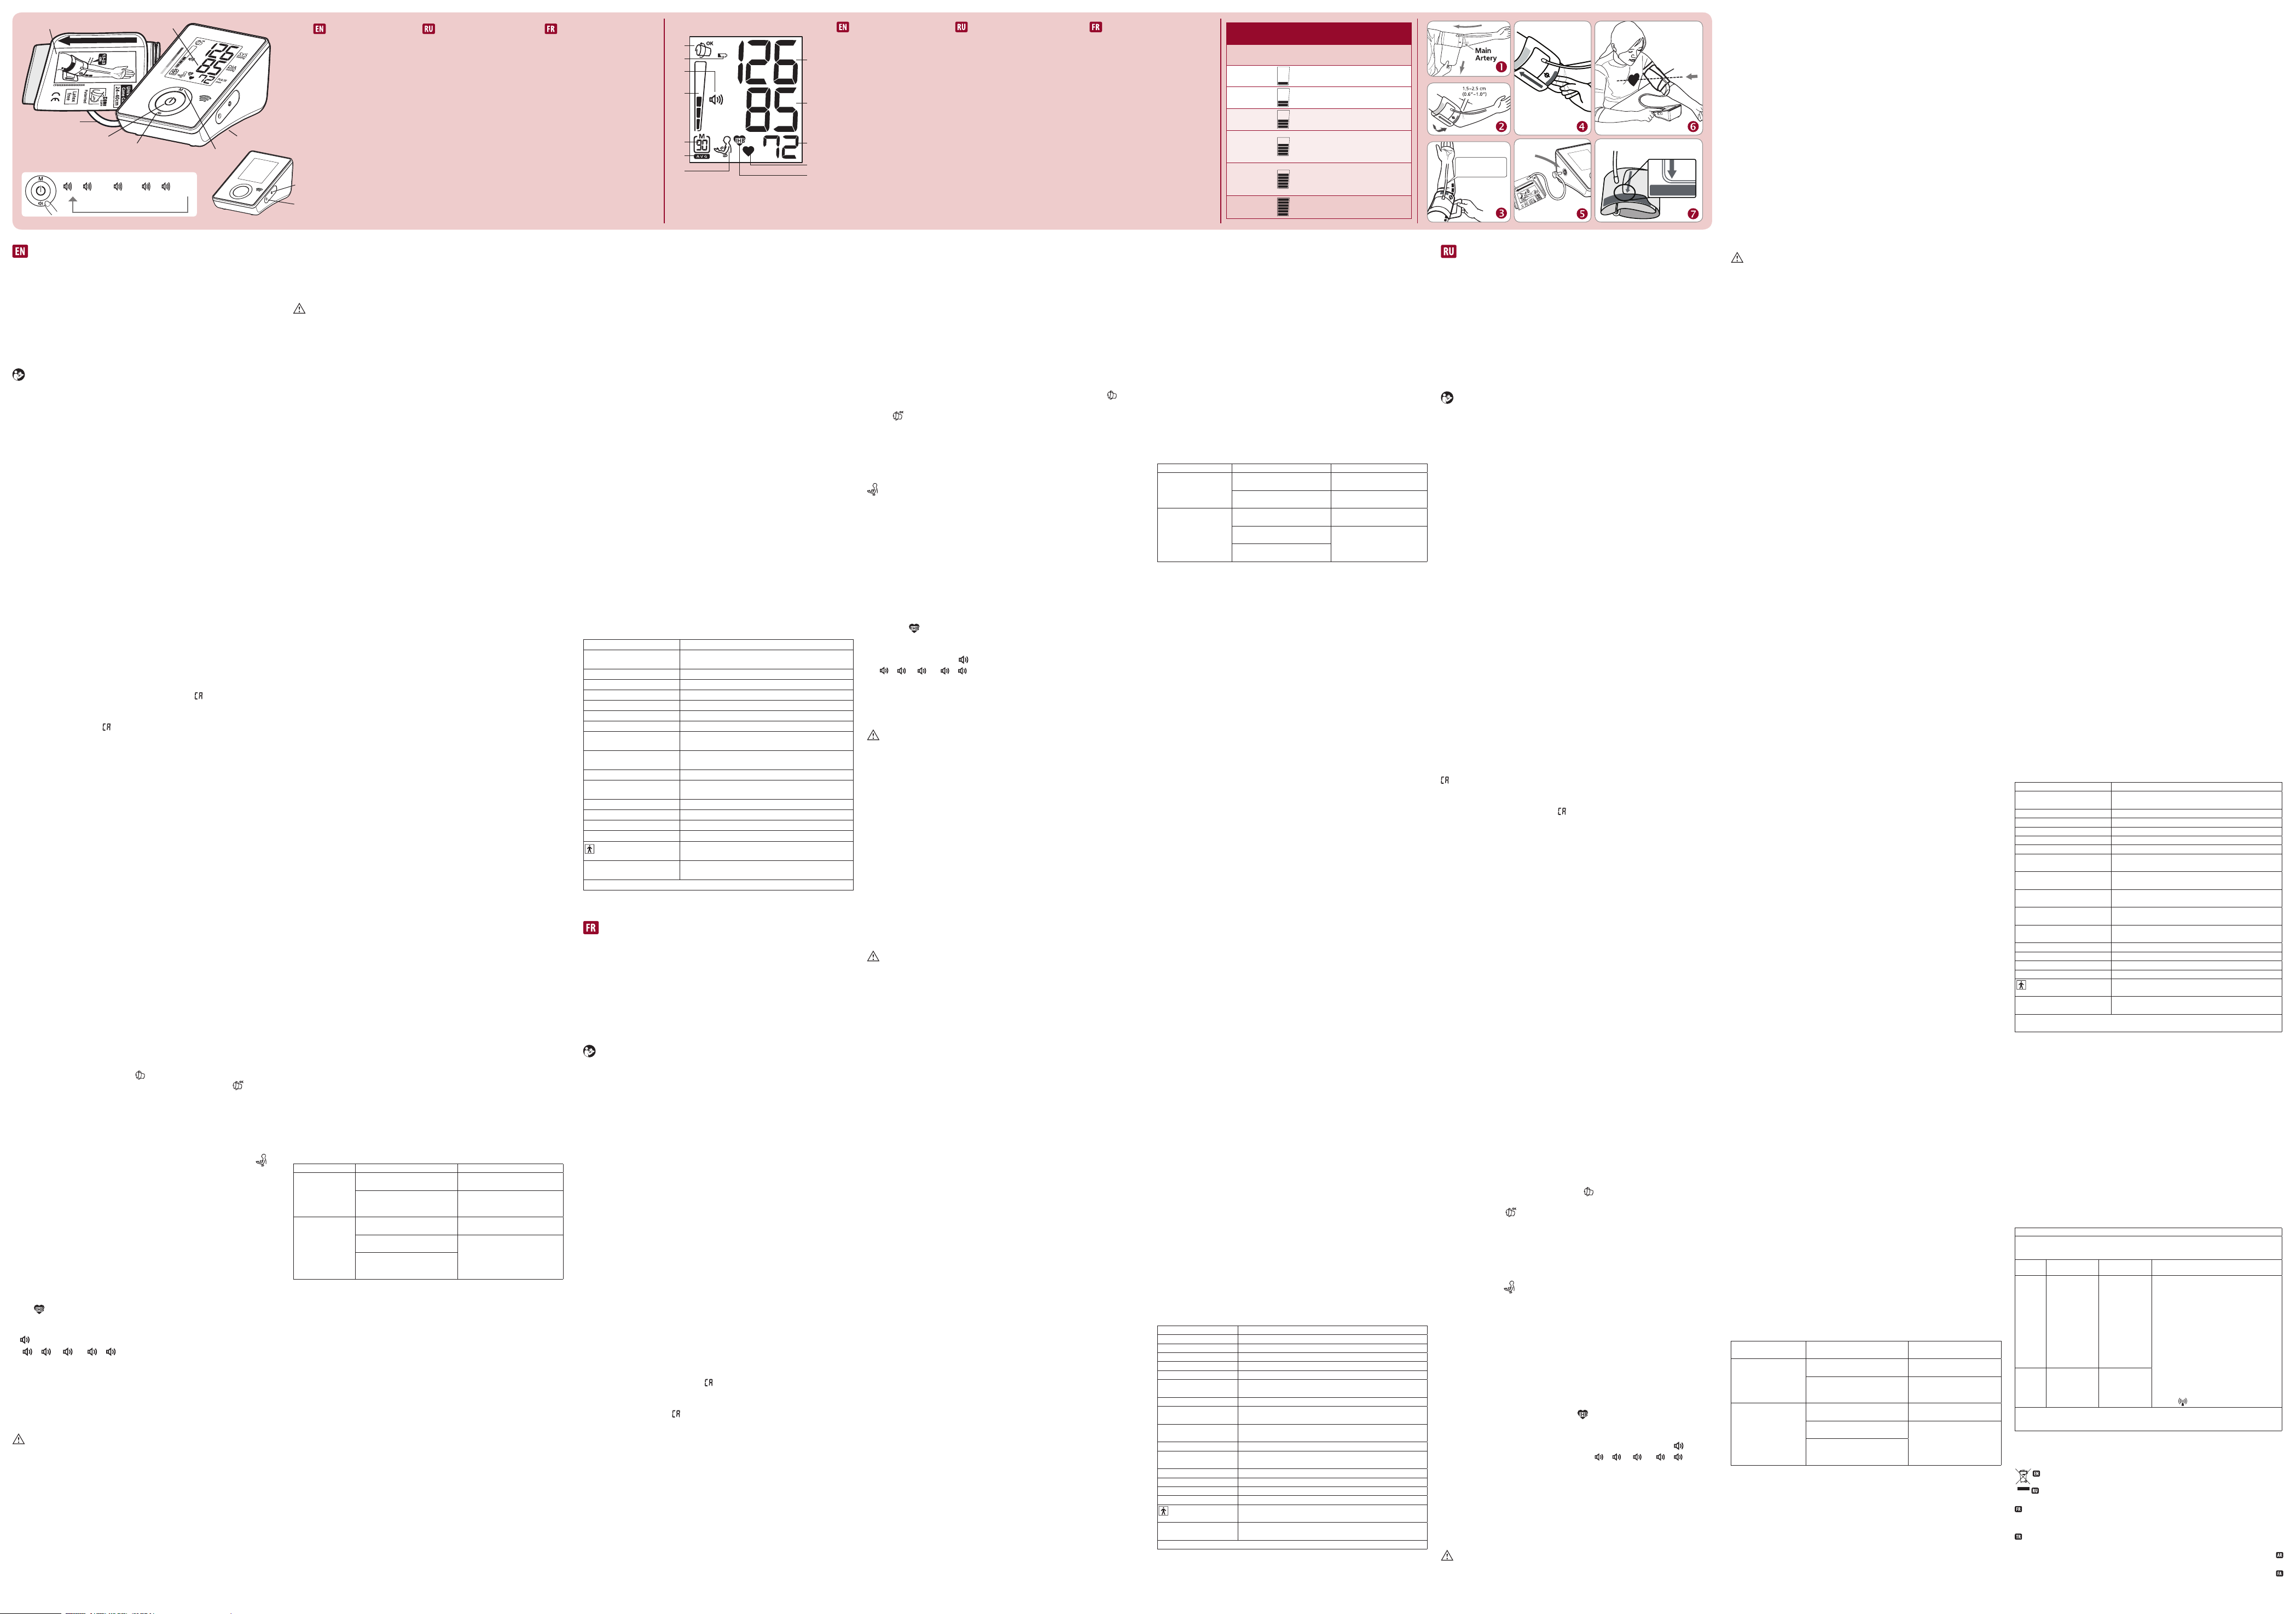
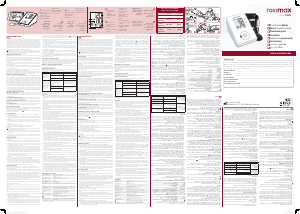
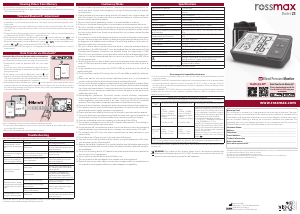
1. Cuff Wrap Detection
2. Weak Battery Mark
3. Talking Speaker Mark
4. Hypertension Risk
Indication
5. Memory Sequence Number
6. Memory Average Mark
7. Movement Mark
8. Systolic Pressure
9. Diastolic Pressure
10. Pulse Rate
11. Pulse Mark
12. Irregular Heartbeat
Detection (IHB)
1. Arm Cu
2. LCD Display
3. Air Tube and Connector
4. ON/OFF/START key
5. Language Selection key
6. Memory Key
7. Battery Cover
8. Data Link Socket
9. AC Adaptor Jack
1. Détection de l’enroulement
du brassard
2. Icône “faible état de charge”
3. Parler Mark
4. Indicateur de risque
d’hypertension
5. Mémoire marquez
6. Mémoire mark moyenne
7. Mouvement marque
8. Pression systolique
9. Pression diastolique
10. Pouls
11. Icône du pouls
12. Détecteur de trouble du
rythme cardiaque (IHB)
1. Brassard pour bras
2. Ecran LCD
3. Tuyau d’air et connecteur
4. Touche ON/OFF/
DEMARRAGE
5. Touche de sélection de la
langue
6. Touche Mémoire
7. Couvercle du logement
des piles
8. Prise pour connexion
données
9. Prise jack pour bloc
secteur CA
2
8
9
10
1
4
3
5
6
7
11
12
Center tube over
middle of arm
8
9
1, 2,... OF, 1, 2,...
(muti-languages)
1. Плечевая манжета
2. ЖК-дисплей
3. Воздушная трубка и
коннектор
4. Кнопка ВКЛ./ВЫКЛ./
ПУСК(ON/OFF/START)
5. Кнопка Выбор языка
6. Кнопка «Память»
7. Крышка батарейного
отсека
8. Гнездо для передачи
данных
9. Гнездо для подключения
блока питания
1. Система определения
правильности одетой манжеты
2. Низкий уровень заряда
батарей
3. Говоря спикер Марк
4. Указатель степени риска
гипертонии
5. Номер ячейки памяти
6. Среднее значение
7. Метка движения
8. Систолическое давление
9. Диастолическое давление
10. Частота пульса
11. Пульс
12. Указатель наличия аритмии
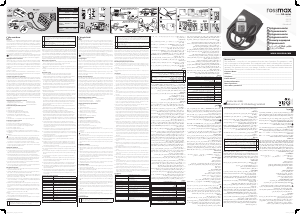
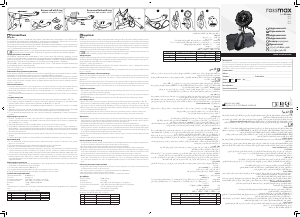
Blood Pressure Standard
World Health Organization (WHO) : 1999
Systolic Pressure
(mmHg)
Diastolic Pressure
(mmHg)
Optimal
<120
and
<80
Normal
120~129
or
80~84
High-normal
130~139
or
85~89
Grade 1
hypertension
(mild)
140~159
or
90~99
Grade 2
hypertension
(moderate)
160~179
or
100~109
Grade 3
hypertension
≥180
or
≥110
1 2
4
3
7
6
5

انضم للمحادثة المتعلقة بهذا المنتج
هنا يمكنك مشاركة رأيك حول Rossmax CF175f جهاز قياس ضغط الدم. إذا كان لديك سؤال، فاقرأ الدليل بعناية أولاً. يمكن طلب الدليل باستخدام نموذج الاتصال الخاص بنا.