Troubleshooting
Sony Corporation ©2001
CFS-929S
Operating Instructions
Radio
Cassette-
Corder
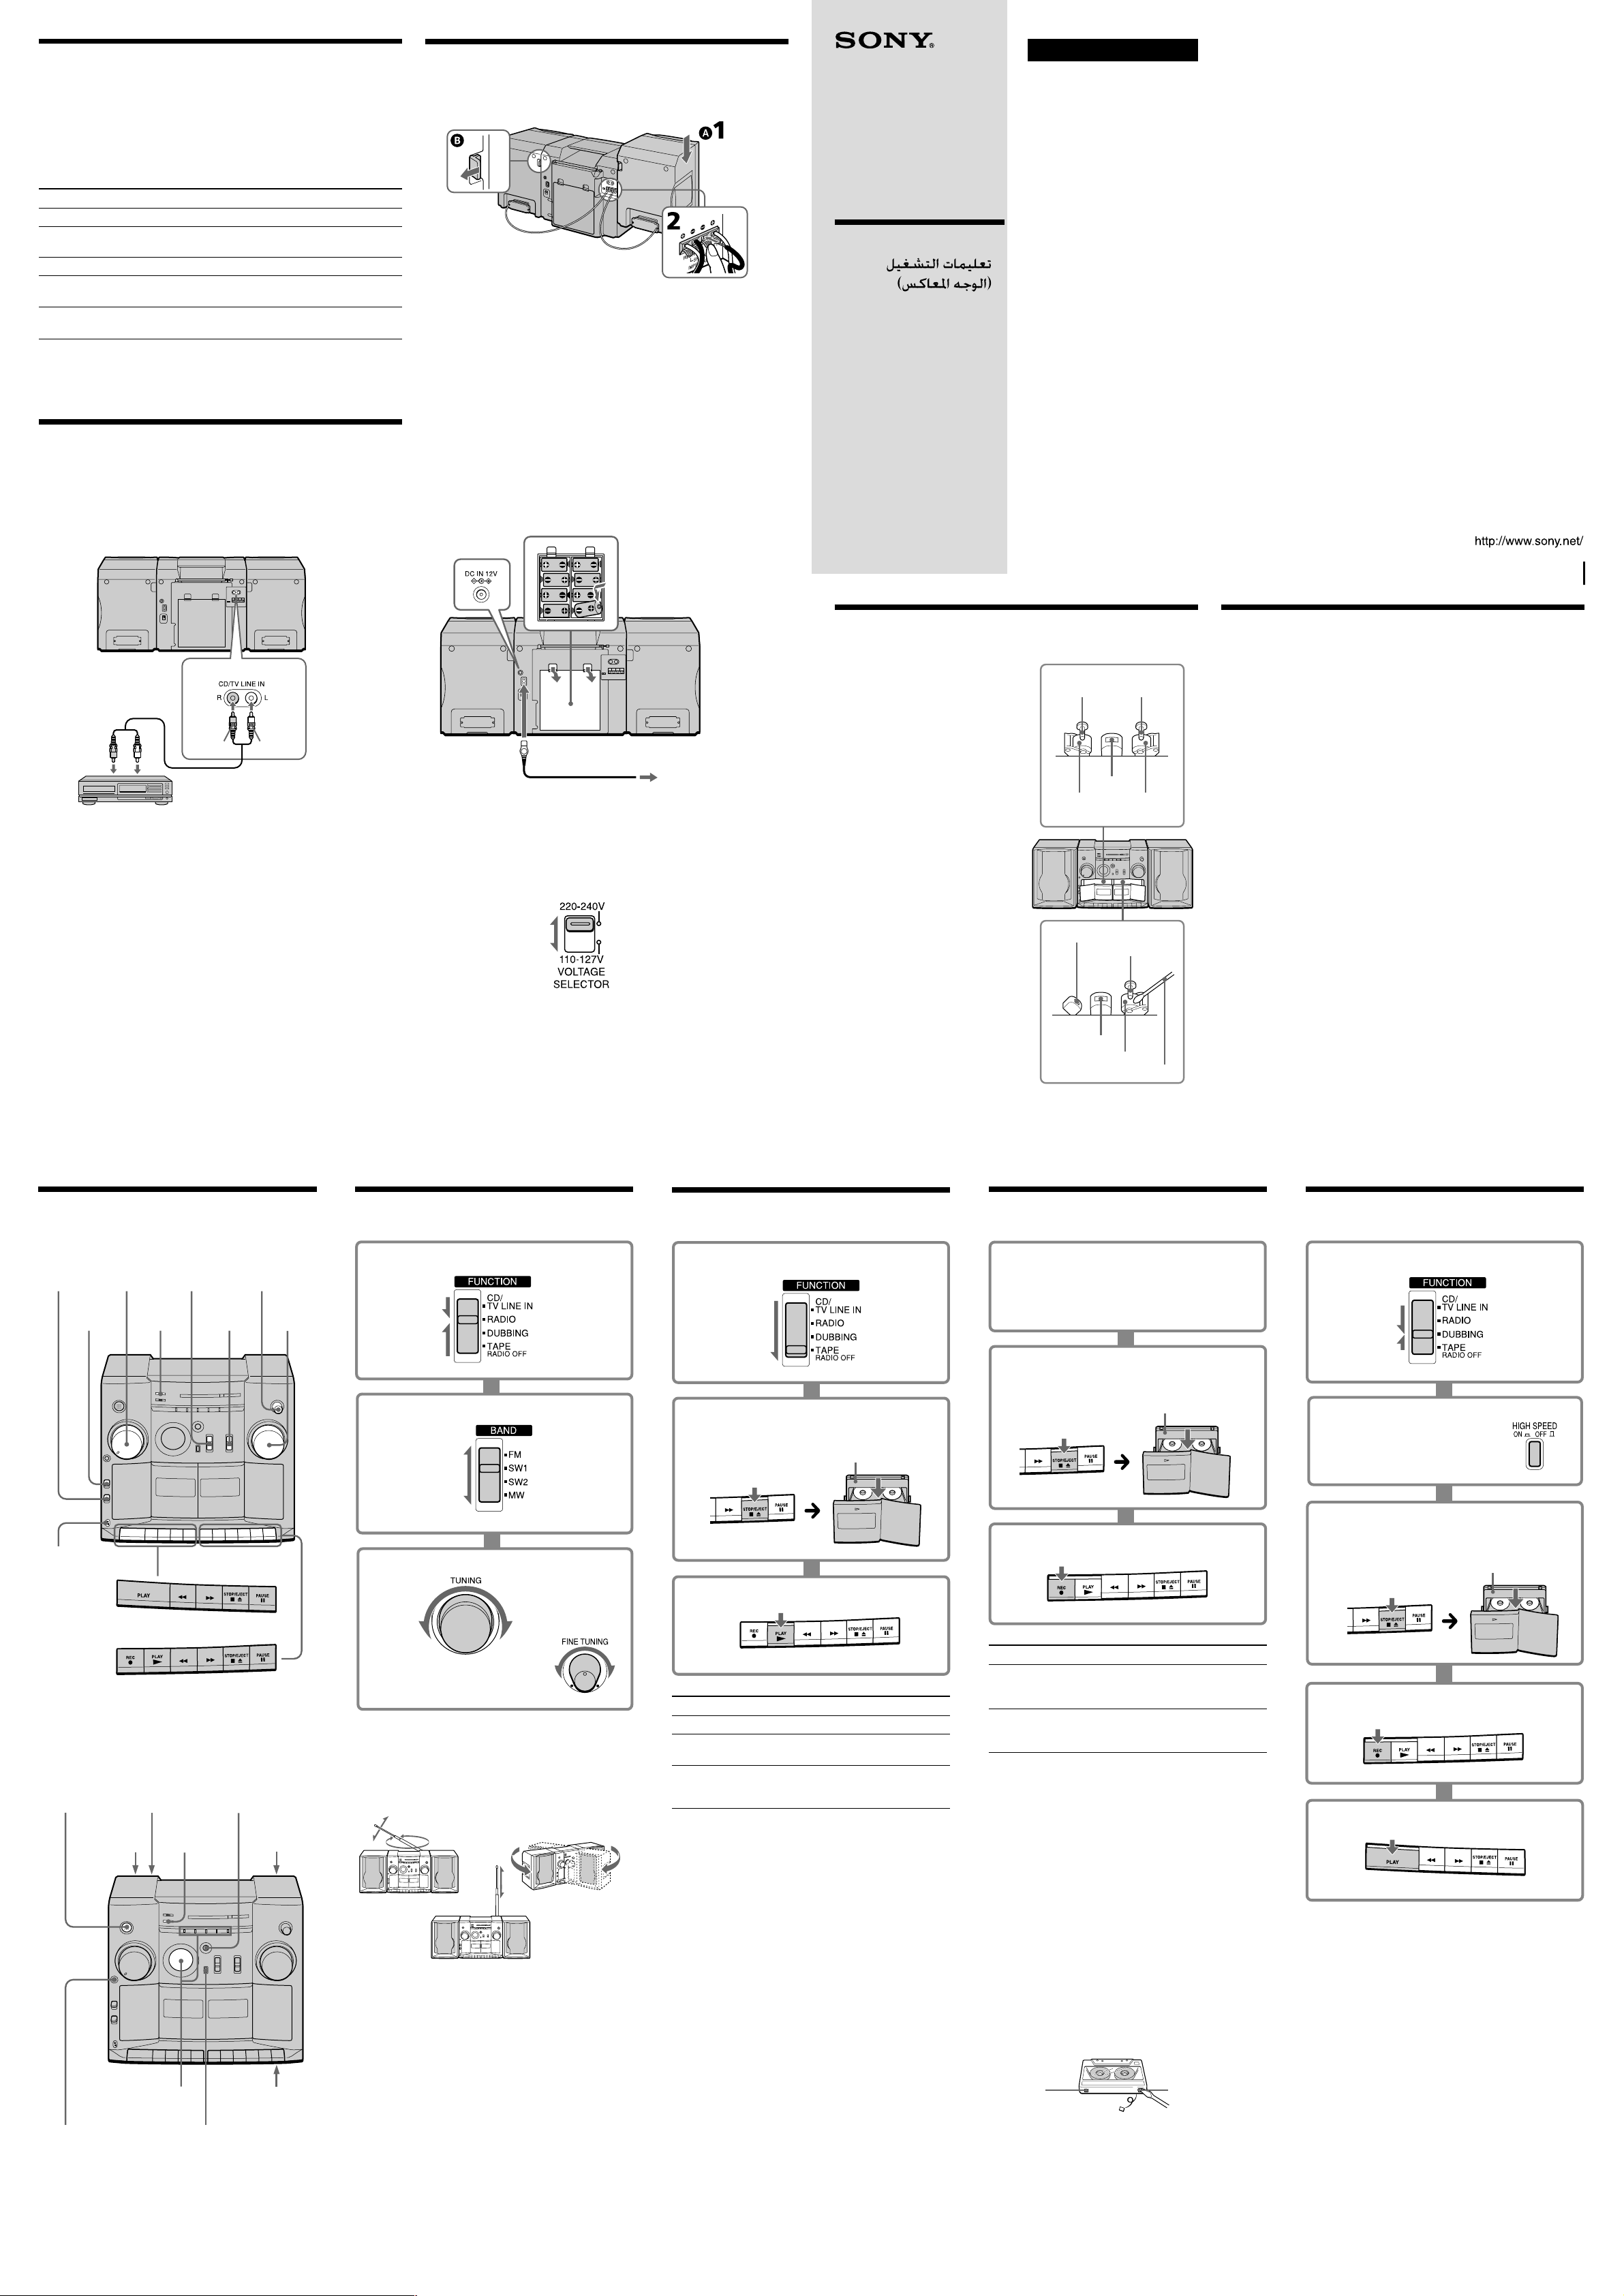
Record/
Playback head
Cotton swab
Capstan
Pinch roller
Pinch
roller
Capstan
3-237-739-13(1)
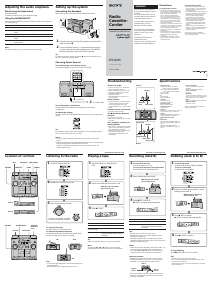
Setting up the system
Connecting the Speakers
Make sure you turn off the power before making connections.
1 Align the grooves and slide the speaker box down until it
snaps into place A.
2 Connect the black wires to (–) minus and the red wires to
(+) plus terminals: the right speaker wires to the RIGHT,
and the left speaker wires to the LEFT terminals.
Tip
To detach the speakers, unlock the speaker B and slide the speaker box all
the way up and away from the player.
Choosing Power Sources
To use the player on AC power source
Connect the supplied AC power cord to the AC IN jack.
Specifications
There is no audio.
• Connect the AC power cord securely.
• Insert the batteries properly.
• Replace all batteries if they are weak.
• Connect the speaker wires securely.
• Unplug the headphones.
• Adjust the volume.
• Set FUNCTION to the position you
want to operate.
Noise is heard.
• Someone is using a portable telephone
or other equipment that emits radio
waves near the player. Move the
portable telephone, etc., away from the
player.
Cassette cannot be inserted.
• Insert the cassette properly.
The z REC button does not
function.
• No cassette is in deck B.
• Make sure the safety tab on the cassette
is in place.
Poor playback, recording or
erasing quality.
• Dirty heads. Clean the unit (as shown)
with a cotton swab slightly moistened
with cleaning fluid or alcohol.
• Demagnetize the heads and all metal
parts in the tape path with a
commercially available tape head
demagnetizer.
• Frequency range
FM: Saudi Arabia: 87.5–107 MHz/
Other countries: 87.5–108 MHz
MW: Saudi Arabia: 530–1 605 kHz/
Other countries: 530–1 611 kHz
SW1: 2.3–7MHz
SW2: 7–22MHz
• IF
FM: 10.7MHz MW/SW: 455 kHz
• Antennas
FM/SW: Telescope MW: Built-in ferrite
bar
• Recording system
4-track, 2-channel stereo
• Frequency response
80–12 500Hz
• Speakers
Full range: 10cm (4 inches) dia. , 4 Ω cone
type/Tweeter: 5 cm (2 inches) dia.
• Input
CD/TV LINE IN jacks (phono jacks),
sensitivity 0.43 V, input impedance 47 kΩ
• Output
Headphones jack (stereo minijack), for
16–68 Ω impedance headphones
• Maximum Power output
24 W
• Battery life
FM Recording: Sony R20P: Approx. 6.5
hours/Sony LR20 alkaline: Approx. 18
hours
Playback: Sony R20P: Approx. 1 hour/
Sony LR20 alkaline: Approx. 3.5 hours
• Power requirements
110–127V/220–240 V AC selectable,
50/60Hz
12V DC, eight R20 (size D) batteries
DC IN 12 V jack
• Power consumption
AC 30W
• Dimensions
Approx.
679 x 263.5 x 239.5
mm (w/h/d)
(26
6
⁄
8
x 10
3
⁄
8
x 9
4
⁄
9
inches) incl. projecting
parts and controls, not incl. handle
• Mass
Approx. 8.6 kg (18 lb 15 oz) incl. batteries
• Supplied accessory
AC power cord (1)
Design and specifications are subject to
change without notice.
WARNING
To use the player on batteries
Insert eight R20 (size D) batteries (not supplied) into the battery
compartment.
To adjust the voltage
Be sure to set the VOLTAGE SELECTOR(at the rear) to your local power
supply.
Tip
For customers supplied with an AC plug adaptor, use it if the plug of the AC
power cord does not match your AC outlet.
Notes
•To use the player on batteries, disconnect the mains lead from the player.
•Replace the batteries when the OPR/BATT indicator dims or when the
player stops operating. Replace all batteries with new ones.
•When you use the DC IN 12V jack, do not connect a power cord to the
cegarette lighter socket.
To prevent fire or shock hazard,
do not expose the player to rain or
moisture.
To avoid electrical shock, do not
open the cabinet. Refer servicing
to qualified personnel only.
Do not install the appliance in a
confined space, such as a
bookcase or built-in cabinet.
To prevent fire or shock hazard,
do not place objects filled with
liquids, such as vases, on the
appliance.
The FUNCTION selector is
located at the front.
When you turn on the player, the
OPR/BATT indicator lights up.
Precautions
On safety/power sources
• Should any solid object or liquid fall
into the player, unplug the player, and
have it checked by qualified personnel
before operating it any further.
• For AC operation, check that the
player’s operating voltage is identical
with your local power supply (see
“Specifications”) and use the supplied
AC power cord; do not use any other
type. The voltage selector is located on
the rear of the player .
• The player is not disconnected from the
AC power source (mains) as long as it is
connected to the wall outlet, even if the
player itself has been turned off.
• For battery operation, use eight R20
(size D) batteries.
• When the batteries are not to be used,
remove them to avoid damage that can
be caused by battery leakage or
corrosion.
• The nameplate indicating operating
voltage, power consumption, etc. is
located at the rear.
On placement/operation
• Do not leave the player in a location
near heat sources, or in a place subject
to direct sunlight, excessive dust or
mechanical shock.
• Do not place anything within 10 mm of
the side of the cabinet. The ventilation
holes must be unobstructed for the
player to operate properly and to
prolong the life of its components.
• Since a strong magnet is used for the
speakers, keep personal credit cards
using magnetic coding or spring-
wound watches away from the player
to prevent possible damage from the
magnet.
• If the player has not been used for a
long time, set it in the playback mode to
warm it up for a few minutes before
inserting a cassette.
If you have questions or problems
concerning your player, please consult
your nearest Sony dealer.
Playback
head
Capstan
Pinch
roller
Erase head
Deck A
Deck B
To
Stop playback
Fast-forward or
rewind the tape
Pause playback
Tips
•FWD/REV ((/n) indicators show the playback side
during playback: FWD ( (foward side), or REV n
(reverse side)(deck A only).
•To select the direction of the tape, set DIR MODE to j
for both sides repeatedly, or g for one side of the play
(deck A only).
•To switch playback to the opposite side, press down
DIRECTION once (deck A only).
•When you play both decks, you will hear only deck B.
Note
Do not press M , m or PLAY on the other deck during
playback as this causes excessive wow and flutter.
Press
xZ
M or m
For the side facing to you.
X
Press this button again to resume
playback .
3 Tune to the station you want.
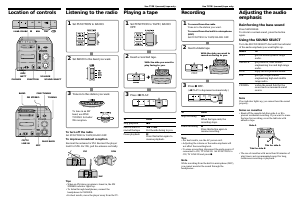
Location of controls Listening to the radio
Playing a tape
To
Stop recording
Pause recording
Press
xZ
When the tape ends, the recording
stops.
X
Press this button again to resume
recording.
Recording (deck B)
1 Set FUNCTION to RADIO.
1 Set FUNCTION to TAPE /RADIO
OFF.
2 Insert a blank tape into deck B.
To record from the radio
Tune to the station you want.
To record from the built-in microphone (MIC)
Set FUNCTION to TAPE/RADIO OFF.
1
Use TYPE I (normal) tape only.
Use TYPE I (normal) tape only.
2 Set BAND to the band you want.
2 Insert a recorded tape into deck A or B.
With the side you want to
play on facing to you
3 Press PLAY.
3 Press r REC on deck B.
With the side you want to
record on facing to you
To turn off the radio
Set FUNCTION to TAPE/RADIO OFF.
To improve broadcast reception
Reorient the antenna for FM. Reorient the player itself
for MW. For SW, pull the antenna vertically.
Tips
•When an FM stereo program is tuned in, the FM STEREO
indicator lights up.
•To listen through headphones, connect the headphones to
PHONES.
•For best results, move the player away from the TV.
SW
To tune in an SW band, use FINE
TUNING for better SW reception.
MW
Dubbing (deck A to B)
To dub at high speed
Press HIGH SPEED to Ø ON.
To dub at normal speed
Press HIGH SPEED to ø OFF.
2
3
Insert a recorded tape into deck A, and a
blank tape into deck B.
With the side you want to
record on facing to you
5 Press PLAY on deck A.
Use TYPE I (normal) tape only.
To stop dubbing
Press xZ on deck A and B.
Tips
• For best results, use the AC power cord.
• Do not set the FUNCTION during dubbing as this causes
excessive wow and flutter.
• To dub at high speed, press HIGH SPEED (Ø ON) after you
have inserted a blank tape in step 3. Do not press HIGH
SPEED during dubbing as this causes excessive wow and
flutter.
• Adjusting the volume or the audio emphasis will not affect
the recording level.
• When the tape in deck A ends first, deck B will also stop
recording. When the tape in deck B ends first, deck A plays
on as set with the DIR MODE switch.
1 Set FUNCTION to DUBBING
Tips
•For best results, use the AC power cord.
•Adjusting the volume or the audio emphasis will not
affect the recording level.
•If the MW program makes a whistling sound, set ISS
(Interference Suppress Switch) (at the rear) to the position
that more decreases the noise.
•To erase a recording, disconnect the audio source if
connected to CD/TV LINE IN. Set FUNCTION to
CD/TV LINE IN and press z REC.
Notes
• While recording from the built-in microphone (MIC), you
cannot monitor the sound through the headphones.
• Do not press M , m or PLAY on deck A during
recording as this causes excessive wow and flutter.
Notes on cassettes
•Break off the cassette tab from side A or B to prevent
accidental recording. If you want to reuse the tape for
recording, cover the tab hole with adhesive tape.
•The use of cassettes with more than 90 minutes of play
time is not recommended except for long, continuous
recording or playback.
Tab for
side A
Side A
Tab for
side B
4 Press z REC on deck B.
N PLAY is depressed automatically.
VOLUME
MIC
OPR/BATT
FUNCTION FINE TUNING
TUNING
BAND
PHONES
ISS (rear)
SOUND SELECT
MAXI BASS
CD/TV LINE IN
(rear)
FM STEREO
VOLTAGE
SELECTOR
(rear)
HIGH SPEED
(ON$ OFF4)
DIRECTION
DIR MODE
Deck A
Deck B
FM
2 to a wall outlet
FWD/REV
indicators
DC IN 12 V
(rear)
1 to AC IN
Adjusting the audio emphasis
Reinforcing the bass sound
Press MAXI BASS.
To return to normal sound, press the button again.
Using the SOUND SELECT
Turn the SOUND SELECT dial until the indicator of the audio emphasis
you want lights up.
Select
FLAT
GROOVE
LIVE
POP
CINEMA
Note
If no indicator lights up, you cannot hear the sound properly.
Connecting optional
components
Before making connections, be sure to turn off the power of the
component and set FUNCTION to TAPE/RADIO OFF on the player.
Listening to Audio Components
After connecting the component, set FUNCTION to CD/TV LINE IN and
play the connected component.
Tip
You can record the sound of the connected component. Insert a cassette, and
press z REC on deck B.
Note
Connect the cables firmly to avoid any malfunction.
Audio connecting cord
RK-C320 (not supplied)
R (red) L (white)
to CD/TV LINE IN
To
get the whole dynamic range audio.
get powerful, clear sounds emphasizing low and high range
audio.
enjoy the live presence sound.
get light, bright sounds emphasizing high and middle range
audio.
widen the sound field for the sound such as monaural
sound source.


انضم للمحادثة المتعلقة بهذا المنتج
هنا يمكنك مشاركة رأيك حول أس سوني CFS-929S مجموعة ستريو. إذا كان لديك سؤال، فاقرأ الدليل بعناية أولاً. يمكن طلب الدليل باستخدام نموذج الاتصال الخاص بنا.