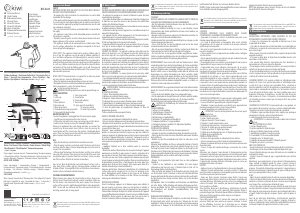
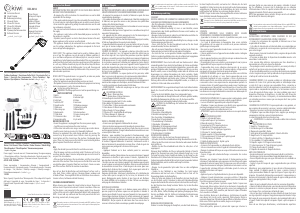
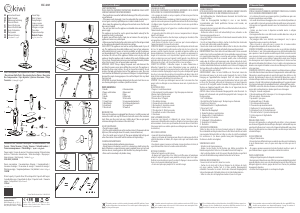
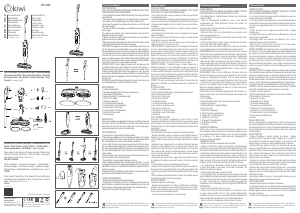
كتيب Kiwi KSC-4210 منظف بخاري
هل تحتاج إلى دليل لـ Kiwi KSC-4210 منظف بخاري الخاص بك؟ يمكنك أدناه عرض وتنزيل دليل PDF باللغة العربية مجانًا. يحتوي هذا المنتج حاليًا على 4 من الأسئلة الشائعة، و0 من التعليقات، كما حصل على 0 من الأصوات. إذا لم يكن هذا هو الدليل الذي تريده، يرجى الاتصال بنا.
هل منتجك معيب ولا يقدم الدليل أي حل؟ انتقل إلى Repair Café للحصول على خدمات الإصلاح المجانية.
كتيب
Loading…

Loading…
التقييم
قم بإخبارنا عن رأيك في Kiwi KSC-4210 منظف بخاري عن طريق ترك تقييم للمنتج. هل تريد أن تشارك بتجاربك مع هذا المنتج أو طرح سؤال ما؟ يرجى ترك تعليق في أسفل الصفحة.المزيد عن دليل المستخدم هذا
نحن ندرك أنه من الجيد أن يكون لديك دليل ورقي لـ Kiwi KSC-4210 منظف بخاري الخاص بك. يمكنك دائمًا تنزيل الدليل من موقعنا الإلكتروني وطباعته بنفسك. إذا كنت ترغب في الحصول على الدليل الأصلي، فنوصيك بالاتصال بـ Kiwi. قد يكون بمقدورهم تقديم دليل أصلي. هل تبحث عن دليل Kiwi KSC-4210 منظف بخاري الخاص بك بلغة مختلفة؟ اختر لغتك المفضلة على صفحتنا الرئيسية وابحث عن رقم الطراز لمعرفة ما إذا كان متوفرًا لدينا.
تحديد
| الاسم التجاري | Kiwi |
| نموذج | KSC-4210 |
| فئة | منظفات بخارية |
| نوع الملف | |
| حجم الملف | 1.03 MB |
كافة الأدلة لـ Kiwi منظفات بخارية
المزيد من أدلة منظفات بخارية
الأسئلة المتداولة حول Kiwi KSC-4210 منظف بخاري
يبحث فريق الدعم لدينا عن معلومات مفيدة عن المنتج وإجابات على الأسئلة المتكررة. وإذا وجت عدم دقة في أسئلتنا المتكررة، فيرجى إخبارنا بذلك عن طريق استخدام استمارة الاتصال بنا.
هل يمكنني استخدام منظف بالبخار على الأرضيات الخشبية مثل الأرضيات الخشبية؟ تم التحقق
نعم ، لكن الأرضيات الخشبية أكثر ضعفًا من البلاط على سبيل المثال. استخدم أقل إعداد في منظف البخار واستخدم قطعة قماش لمنع التلف.
كان ذلك مفيدا (385) اقرأ أكثريُنتج جهاز التنظيف بالبخار كمية قليلة جدًا من البخار، فماذا يمكنني أن أفعل؟ تم التحقق
قم أولاً بفحص حاوية المياه لمعرفة ما إذا كان هناك ما يكفي من الماء. قد يكون تراكم الحجم سببًا آخر لانخفاض إنتاج البخار. راجع دليل منظف البخار الخاص بك لمعرفة كيفية إزالة الترسبات الكلسية من طرازك.
كان ذلك مفيدا (154) اقرأ أكثرلا أستطيع الضغط على زر/ذراع البخار، لماذا؟ تم التحقق
تحتوي بعض أجهزة التنظيف بالبخار على قفل أمان للأطفال. إذا تم تنشيط هذا، فلن يعمل زر البخار أو الرافعة. قم بإلغاء تنشيط قفل أمان الأطفال لاستخدام جهاز التنظيف بالبخار.
كان ذلك مفيدا (128) اقرأ أكثرهل يمكنني استخدام المنظفات أو المواد الكيميائية الأخرى في منظف البخار؟ تم التحقق
لا، يمكن للمنظفات أو المواد الكيميائية الأخرى أن تلحق الضرر بجهاز التنظيف بالبخار وفي كثير من الحالات ستؤدي إلى إبطال الضمان على المنتج.
كان ذلك مفيدا (60) اقرأ أكثر


انضم للمحادثة المتعلقة بهذا المنتج
هنا يمكنك مشاركة رأيك حول Kiwi KSC-4210 منظف بخاري. إذا كان لديك سؤال، فاقرأ الدليل بعناية أولاً. يمكن طلب الدليل باستخدام نموذج الاتصال الخاص بنا.