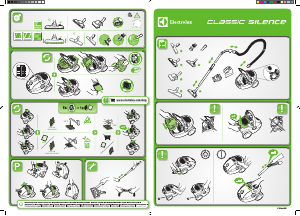
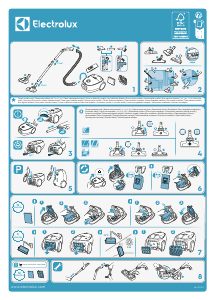
كتيب مكنسة كهربائية PD91-ALRGY الكترولوكس
هل تحتاج إلى دليل لـ مكنسة كهربائية PD91-ALRGY الكترولوكس الخاص بك؟ يمكنك أدناه عرض وتنزيل دليل PDF باللغة العربية مجانًا. يحتوي هذا المنتج حاليًا على 10 من الأسئلة الشائعة، و0 من التعليقات، كما حصل على 0 من الأصوات. إذا لم يكن هذا هو الدليل الذي تريده، يرجى الاتصال بنا.
هل منتجك معيب ولا يقدم الدليل أي حل؟ انتقل إلى Repair Café للحصول على خدمات الإصلاح المجانية.
كتيب
Loading…


Loading…
التقييم
قم بإخبارنا عن رأيك في مكنسة كهربائية PD91-ALRGY الكترولوكس عن طريق ترك تقييم للمنتج. هل تريد أن تشارك بتجاربك مع هذا المنتج أو طرح سؤال ما؟ يرجى ترك تعليق في أسفل الصفحة.المزيد عن دليل المستخدم هذا
نحن ندرك أنه من الجيد أن يكون لديك دليل ورقي لـ مكنسة كهربائية PD91-ALRGY الكترولوكس الخاص بك. يمكنك دائمًا تنزيل الدليل من موقعنا الإلكتروني وطباعته بنفسك. إذا كنت ترغب في الحصول على الدليل الأصلي، فنوصيك بالاتصال بـ Electrolux. قد يكون بمقدورهم تقديم دليل أصلي. هل تبحث عن دليل مكنسة كهربائية PD91-ALRGY الكترولوكس الخاص بك بلغة مختلفة؟ اختر لغتك المفضلة على صفحتنا الرئيسية وابحث عن رقم الطراز لمعرفة ما إذا كان متوفرًا لدينا.
تحديد
| الاسم التجاري | Electrolux |
| نموذج | PD91-ALRGY |
| فئة | مكانس كهربائية |
| نوع الملف | |
| حجم الملف | 6.04 MB |
كافة الأدلة لـ مكانس كهربائية الكترولوكس
المزيد من أدلة مكانس كهربائية
الأسئلة المتداولة حول مكنسة كهربائية PD91-ALRGY الكترولوكس
يبحث فريق الدعم لدينا عن معلومات مفيدة عن المنتج وإجابات على الأسئلة المتكررة. وإذا وجت عدم دقة في أسئلتنا المتكررة، فيرجى إخبارنا بذلك عن طريق استخدام استمارة الاتصال بنا.
خرطوم المكنسة الكهربائية الخاص بي مسدود ، ماذا أفعل؟ تم التحقق
افصل الخرطوم وانظر من خلاله لتحديد ما إذا كان مسدودًا بالفعل. إذا كان هذا هو الحال ، فيمكنك أن تأخذ شيئًا طويلاً مثل عصا المكنسة وتدفعه بحرص عبر الخرطوم. سيؤدي هذا بشكل عام إلى إزالة أي أشياء تسد الخرطوم. إذا لم يساعدك ذلك ، يجب عليك الاتصال بالشركة المصنعة.
كان ذلك مفيدا (1464) اقرأ أكثرما هي أحجام كيس الغبار الموجودة؟ تم التحقق
هناك نوعان من الأحجام التي يجب أخذها في الاعتبار. الأول هو حجم اللوحة مع مدخل الحقيبة. يحدد هذا ما إذا كانت كيس الغبار مناسبًا لمكنسة كهربائية معينة. ثم هناك حجم الحقيبة. يشار إلى هذا في الغالب باللترات ويحدد مقدار الغبار الذي يمكن أن يحمله الكيس.
كان ذلك مفيدا (943) اقرأ أكثرأريد أن أعرف عمر جهازي الكترولوكس. كيف يمكنني فعل ذلك؟ تم التحقق
يمكنك تحديد عمر منتجك باستخدام الرقم التسلسلي. يمكن العثور على هذا على جهازك. يشير الحرف الأول من الرقم التسلسلي إلى عام (على سبيل المثال: 1 = 2001) ويشير الحرفان بعد ذلك إلى أسبوع الإنتاج (أي: 35 = الأسبوع 35 من تلك السنة). لذا فإن الرقم التسلسلي 13500016 يشير إلى أن الجهاز من الأسبوع 35 من عام 2001.
كان ذلك مفيدا (836) اقرأ أكثرلا يتم إرجاع سلك الطاقة الخاص بالمكنسة الكهربائية إلى الجهاز ، فماذا أفعل؟ تم التحقق
من الممكن أن يكون هناك التفاف أو ثني في الحبل. قم بلف السلك بالكامل عدة مرات وأعد لفه مرة أخرى في الجهاز تحت إشراف يديك. إذا لم يؤد ذلك إلى حل المشكلة ، فمن الممكن أن تكون آلية إرجاع السلك مكسورة. في هذه الحالة ، اتصل بالشركة المصنعة أو خدمة الإصلاح.
كان ذلك مفيدا (658) اقرأ أكثرتُصدر المكنسة الكهربائية صوت صفير ، فماذا أفعل؟ تم التحقق
غالبًا ما تحدث هذه المشكلة بسبب كيس غبار أو مرشح ممتلئ أو عند وجود فتحة تسمح بدخول الهواء إلى الخرطوم. افحص كيس الغبار والفلتر واستبدلهما إذا لزم الأمر. افحص الخرطوم بحثًا عن أي ثقوب أو وصلات سيئة. إذا لم يؤد ذلك إلى حل المشكلة ، فاتصل بالشركة المصنعة.
كان ذلك مفيدا (551) اقرأ أكثركيف أزيل الغبار والشعر من رأس فرشاة المكنسة الكهربائية؟ تم التحقق
تتم إزالة الغبار والشعر من رأس فرشاة المكنسة الكهربائية يدويًا. إذا لم يتم ذلك كما هو مرغوب ، فمن الممكن استخدام مشط ناعم لإزالة الأوساخ المتبقية.
كان ذلك مفيدا (536) اقرأ أكثرما الإعداد على رأس فرشاة المكنسة الكهربائية الذي يجب أن أستخدمه؟ تم التحقق
تحتوي جميع المكانس الكهربائية تقريبًا على رأس بفرشاة قابلة للتعديل. استخدم الفرشاة للأسطح الصلبة لمنع الخدوش والتلف. أغلق فرشاة السجاد والبسط.
كان ذلك مفيدا (419) اقرأ أكثرهل يمكنني استخدام كيس غبار ورقي أكثر من مرة؟ تم التحقق
هذا غير مستحسن. سوف تتشبع مسام الكيس وات ، مما يتسبب في فقدان الامتصاص وربما إتلاف المحرك.
كان ذلك مفيدا (286) اقرأ أكثرما هو HEPA؟ تم التحقق
HEPA تعني هواء جسيمات عالي الكفاءة. تحتوي العديد من المكانس الكهربائية على مرشح HEPA. سيتوقف مرشح HEPA عن 85٪ على الأقل و 99،999995٪ على الأكثر من كل الجسيمات التي يبلغ حجمها 0،3 ميكرومتر (ميكرومتر) وما فوق.
كان ذلك مفيدا (260) اقرأ أكثرهل يمكنني استخدام مكنسة كهربائية عادية لامتصاص الرماد؟ تم التحقق
لا ، هذا غير ممكن على الإطلاق. قد يكون الرماد الذي يبدو باردًا دافئًا أو ساخنًا بالداخل. المكنسة الكهربائية العادية غير مصممة لهذا وقد تتسبب في نشوب حريق. أيضًا ، فلاتر المكانس الكهربائية العادية ليست دائمًا مناسبة للاحتفاظ بالجزيئات الصغيرة جدًا مثل الرماد. يمكن أن تصل بعد ذلك إلى محرك المكنسة الكهربائية وتتسبب في تلفها.
كان ذلك مفيدا (251) اقرأ أكثر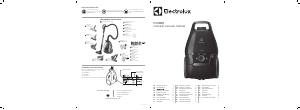

انضم للمحادثة المتعلقة بهذا المنتج
هنا يمكنك مشاركة رأيك حول مكنسة كهربائية PD91-ALRGY الكترولوكس. إذا كان لديك سؤال، فاقرأ الدليل بعناية أولاً. يمكن طلب الدليل باستخدام نموذج الاتصال الخاص بنا.